


Of all the recipes that have become staples in my kitchen, this one holds a special place, born from a moment of beautiful, chaotic necessity. I was tasked with bringing a “unique and refreshing appetizer” to a sweltering summer potluck, and my usual go-to dishes just didn’t feel right. I wanted something elegant yet easy, something that could be made ahead, and something that wouldn’t require a fork and knife while balancing a plate on your lap. Rummaging through my fridge, I found a jar of roasted red peppers, a block of feta, and a tub of Greek yogurt. An idea sparked. The result was these Chilled Roasted Pepper Pasta Cups. When I arrived at the party, I placed the tray of vibrant, individual pasta cups on the table, and they were gone in under fifteen minutes. People I’d never met were coming up to me, asking for the recipe. It was the undisputed hit of the gathering, a creamy, smoky, tangy, and utterly refreshing bite that perfectly captured the essence of summer. Since that day, these pasta cups have been my secret weapon for everything from elegant bridal showers to casual backyard barbecues, and they never fail to impress.
Ingredients
Here is everything you will need to create these delightful and refreshing pasta cups. Each component is chosen to build layers of flavor, from the smoky sweetness of the peppers to the tangy creaminess of the sauce.
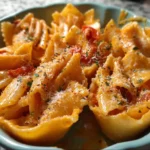
- Medium Shell Pasta (1 pound / 450g): The cup-like shape of the shells is perfect for cradling the creamy roasted pepper sauce, ensuring a burst of flavor in every bite.
- Large Red Bell Peppers (3, or 1 12-oz jar of roasted red peppers): These are the star of the show. Roasting them brings out a deep, smoky sweetness that forms the base of the sauce. Using fresh peppers and roasting them yourself yields the most vibrant flavor, but good-quality jarred peppers are a fantastic time-saver.
- Full-Fat Greek Yogurt (1 cup / 240g): This is the secret to a luxuriously creamy sauce without the heaviness of mayonnaise. It adds a pleasant tang and a boost of protein.
- Crumbled Feta Cheese (1 cup / 150g): The salty, briny notes of feta cheese cut through the richness of the sauce and provide a wonderful textural contrast.
- Fresh Garlic (3 cloves, minced): Provides a pungent, aromatic kick that balances the sweetness of the peppers. Adjust to your personal taste.
- Fresh Basil Leaves (1/2 cup, packed, plus more for garnish): Lends a fresh, slightly peppery, and aromatic quality that screams summer.
- Extra Virgin Olive Oil (1/4 cup / 60ml): Enriches the sauce, adding a smooth mouthfeel and a fruity, peppery undertone.
- Lemon Juice (2 tablespoons, freshly squeezed): A crucial element that brightens all the flavors and adds a zesty, clean finish to the sauce.
- Salt (1 teaspoon, or to taste): Enhances all the other flavors in the dish.
- Black Pepper (1/2 teaspoon, freshly ground): Adds a touch of gentle heat and complexity.
- Red Pepper Flakes (1/4 teaspoon, optional): For those who enjoy a little extra kick of heat to contrast the cool, creamy sauce.
Instructions
Follow these detailed steps to assemble the Chilled Roasted Pepper Pasta Cups. The process is straightforward, involving three main stages: preparing the components, creating the sauce, and bringing it all together.
Step 1: Roast the Bell Peppers (if using fresh)
- Preheat your oven’s broiler to high.
- Cut the bell peppers in half lengthwise and remove the stems, seeds, and white membranes.
- Place the pepper halves, skin-side up, on a baking sheet lined with aluminum foil.
- Broil for 5-10 minutes, or until the skins are thoroughly blackened and blistered. Keep a close eye on them to prevent them from burning through.
- Once blackened, carefully remove the baking sheet from the oven. Immediately transfer the hot peppers to a bowl and cover it tightly with plastic wrap, or place them in a paper bag and seal it. Let them steam for 15-20 minutes. This process loosens the skin, making it incredibly easy to peel.
- Once cooled enough to handle, use your fingers to peel away the blackened skin. It should slip off easily. Discard the skins.
Step 2: Cook the Pasta
- Bring a large pot of heavily salted water to a rolling boil. Salting the water is the only chance you have to season the pasta itself, so be generous.
- Add the medium shell pasta and cook according to package directions until al dente. It’s important not to overcook the pasta, as it will soften slightly as it sits in the sauce. An al dente texture will hold up best.
- Once cooked, drain the pasta in a colander and rinse it briefly under cold running water. This stops the cooking process and removes some of the surface starch, preventing the pasta from clumping together as it cools.
- Set the pasta aside to drain completely and cool down.
Step 3: Prepare the Creamy Roasted Pepper Sauce
- In the bowl of a food processor or a high-powered blender, combine the roasted red peppers, Greek yogurt, minced garlic, 1/4 cup of the fresh basil leaves, extra virgin olive oil, and fresh lemon juice.
- Pulse the mixture until it becomes smooth and creamy. You may need to scrape down the sides of the bowl a few times to ensure everything is well incorporated.
- Taste the sauce and season generously with salt, black pepper, and the optional red pepper flakes. Blend again briefly to combine. The sauce should be vibrant orange-red, fragrant, and bursting with flavor.
Step 4: Combine and Chill
- In a large mixing bowl, combine the cooled pasta, the creamy roasted pepper sauce, the crumbled feta cheese, and the remaining 1/4 cup of fresh basil (you can tear or roughly chop the leaves).
- Gently fold everything together until the pasta is evenly coated with the sauce and the feta and basil are distributed throughout. Be careful not to overmix, which can break down the feta too much.
- Cover the bowl with plastic wrap and transfer it to the refrigerator to chill for at least 2 hours. This step is crucial! Chilling allows the flavors to meld and deepen, resulting in a much more delicious final product. For best results, let it chill for 4 hours or even overnight.
Step 5: Serve
- Once chilled, give the pasta salad a final stir. If it seems a little thick (the pasta will absorb some of the sauce), you can stir in a tablespoon of Greek yogurt or a drizzle of olive oil to loosen it.
- Spoon the chilled pasta salad into individual serving vessels like small cups, glasses, or muffin tin liners.
- Garnish with extra crumbled feta, a fresh basil leaf, and a light dusting of black pepper before serving.
Nutrition Facts
- Servings: This recipe makes approximately 12 individual appetizer-sized cups.
- Calories per serving: Approximately 220-250 kcal.
- Rich in Vitamin C: The red bell peppers are an excellent source of Vitamin C, a powerful antioxidant that supports immune function and skin health.
- Good Source of Protein: Thanks to the Greek yogurt and feta cheese, each cup provides a decent amount of protein, which helps with satiety and makes this appetizer more satisfying.
- Healthy Fats: The use of extra virgin olive oil provides monounsaturated fats, which are beneficial for heart health.
- Source of Calcium: Feta cheese and Greek yogurt contribute to your daily calcium intake, essential for strong bones and teeth.
- Complex Carbohydrates: The pasta provides sustained energy, making this a great option for a light lunch or a substantial appetizer that will keep you fueled.
Preparation Time
The total time for this recipe is approximately 2 hours and 45 minutes, but the majority of this is hands-off chilling time. The active preparation time is only about 30-40 minutes, making it an excellent make-ahead dish for parties and events. The chilling period is essential for the flavors to fully develop and combine.
How to Serve
The beauty of these Chilled Roasted Pepper Pasta Cups lies in their versatility. They can be dressed up or down depending on the occasion. Here are some creative ways to serve them:
- For a Casual Backyard Barbecue or Potluck:
- Spoon the pasta salad into colorful paper muffin or cupcake liners placed on a large platter. This makes for easy, grab-and-go single servings with no cleanup.
- Serve it in a large, rustic wooden bowl with a serving spoon, allowing guests to help themselves. Garnish the top generously with a mountain of fresh basil and feta.
- For an Elegant Party or Bridal Shower:
- Use small, clear glass votive holders or shot glasses for a sophisticated and modern look. The vibrant color of the sauce will be beautifully visible.
- Spoon into crisp, edible endive or radicchio leaves for a gluten-free and elegant presentation.
- Garnish each cup with a single, perfect basil leaf and a high-quality, aged balsamic glaze drizzled over the top.
- For a Perfect Picnic or Packed Lunch:
- Pack the pasta salad into small mason jars with screw-on lids. This keeps them fresh, makes them easily portable, and looks incredibly charming.
- For a bento-box style lunch, portion the pasta cups into one compartment, with fresh veggies, fruits, and nuts in the others.
- As a Light and Refreshing Main Course:
- Serve a larger portion in a bowl as a satisfying lunch or light dinner.
- Pair it with a side of grilled chicken, shrimp, or a simple green salad with a vinaigrette to make it a more complete meal.
Additional Tips
To help you perfect this recipe and make it your own, here are eight additional tips for success.
- Make It Ahead for Maximum Flavor: This recipe is good after two hours of chilling, but it’s spectacular when made a day in advance. The pasta has more time to absorb the smoky, tangy flavors of the sauce, and the garlic mellows perfectly. This makes it an ideal, stress-free party dish.
- Don’t Be Afraid to Add Protein: To transform these cups from an appetizer into a more substantial meal, consider adding a protein source. Shredded rotisserie chicken, canned chickpeas (rinsed and drained), or grilled shrimp all mix in beautifully.
- Experiment with Cheeses: While feta is the classic choice for its salty bite, this recipe is also delicious with other cheeses. Try using soft, creamy goat cheese for a tangier profile, or small fresh mozzarella pearls (bocconcini) for a milder, chewier texture.
- Spice It Up Your Way: The quarter teaspoon of red pepper flakes adds a gentle warmth. If you and your guests love heat, don’t hesitate to increase the amount. You could also add a finely minced jalapeño to the food processor along with the garlic for a fresh, vibrant spice.
- The Secret to Non-Gummy Cold Pasta: The brief rinse with cold water after draining is key for a cold pasta salad. It halts the cooking and washes away excess starch that can make the pasta sticky and clumpy as it cools. Don’t skip this step.
- Achieve the Perfect Sauce Consistency: If your sauce seems too thick after blending, you can thin it out with a tablespoon of water or more lemon juice. If it seems too thin, you can add a bit more Greek yogurt or even a few cashews to the food processor to thicken it up.
- Get Creative with Vegetable Add-ins: Feel free to add more texture and flavor with other finely chopped vegetables. Kalamata olives, sun-dried tomatoes (the oil-packed kind, drained), chopped artichoke hearts, or finely diced cucumber would all be wonderful additions. Stir them in with the feta and basil.
- Elevate with a Garnish: A good garnish is more than just decoration; it adds a final layer of flavor and texture. Beyond basil and feta, consider a sprinkle of toasted pine nuts for a nutty crunch, a drizzle of high-quality balsamic glaze for a sweet and tangy finish, or some fresh lemon zest to enhance the brightness.
FAQ Section
Here are answers to some of the most frequently asked questions about this Chilled Roasted Pepper Pasta Cups recipe.
1. Can I use jarred roasted red peppers instead of roasting my own?
Absolutely! Using a jar of high-quality roasted red peppers is a fantastic time-saver and the recipe will still be delicious. Simply drain the peppers well from their packing liquid and pat them dry with a paper towel before adding them to the food processor. You will need about 1.5 cups of drained, packed peppers to equal three fresh ones.
2. How can I make this recipe vegan or dairy-free?
This recipe can be easily adapted. For a dairy-free and vegan version, substitute the Greek yogurt with a plain, unsweetened dairy-free yogurt (like coconut or almond-based) or use a vegan sour cream alternative. For the feta, use a store-bought vegan feta substitute, which has a similar salty, briny flavor profile.
3. How long will these pasta cups last in the refrigerator?
When stored in an airtight container in the refrigerator, the Chilled Roasted Pepper Pasta Salad will stay fresh and delicious for up to 3-4 days. The flavors will continue to meld, so it’s often even better on day two. If you’ve pre-portioned them into cups, cover the tray tightly with plastic wrap.
4. Can I freeze this pasta salad?
Unfortunately, freezing is not recommended for this recipe. The Greek yogurt-based sauce can separate and become watery upon thawing, and the pasta’s texture will become mushy. The fresh basil will also lose its flavor and turn dark. This dish is best enjoyed fresh from the refrigerator.
5. What are the best pasta shapes to use if I don’t have shells?
If you don’t have medium shells, other pasta shapes with plenty of nooks and crannies are excellent choices. Try using fusilli (corkscrews), rotini, farfalle (bow-ties), or orecchiette. The goal is to use a shape that will effectively hold onto the creamy sauce.
6. My sauce tastes a little bland. How can I fix it?
If your sauce is lacking punch, it’s usually one of three things. First, add more salt. Salt is a flavor enhancer and can make a huge difference. Second, add another squeeze of lemon juice to brighten it up. Acidity wakes up all the other flavors. Finally, if you like a more pungent flavor, you can add another small clove of raw garlic.
7. Is this recipe considered healthy?
Yes, this can be considered a relatively healthy recipe, especially when compared to traditional creamy pasta salads made with mayonnaise. It’s packed with vegetables (bell peppers), protein from Greek yogurt, and healthy fats from olive oil. Using whole wheat pasta can further increase its fiber content.
8. Can I make this a main course instead of an appetizer?
Definitely! This recipe transitions beautifully from an appetizer to a light and satisfying main course. Simply serve a larger portion in a bowl. To make it more filling, you can serve it over a bed of fresh arugula or spinach, or mix in a protein like grilled chicken, canned tuna, or chickpeas as mentioned in the tips section.
Chilled Roasted Pepper Pasta Cups
Ingredients
Here is everything you will need to create these delightful and refreshing pasta cups. Each component is chosen to build layers of flavor, from the smoky sweetness of the peppers to the tangy creaminess of the sauce.
- Medium Shell Pasta (1 pound / 450g): The cup-like shape of the shells is perfect for cradling the creamy roasted pepper sauce, ensuring a burst of flavor in every bite.
- Large Red Bell Peppers (3, or 1 12-oz jar of roasted red peppers): These are the star of the show. Roasting them brings out a deep, smoky sweetness that forms the base of the sauce. Using fresh peppers and roasting them yourself yields the most vibrant flavor, but good-quality jarred peppers are a fantastic time-saver.
- Full-Fat Greek Yogurt (1 cup / 240g): This is the secret to a luxuriously creamy sauce without the heaviness of mayonnaise. It adds a pleasant tang and a boost of protein.
- Crumbled Feta Cheese (1 cup / 150g): The salty, briny notes of feta cheese cut through the richness of the sauce and provide a wonderful textural contrast.
- Fresh Garlic (3 cloves, minced): Provides a pungent, aromatic kick that balances the sweetness of the peppers. Adjust to your personal taste.
- Fresh Basil Leaves (1/2 cup, packed, plus more for garnish): Lends a fresh, slightly peppery, and aromatic quality that screams summer.
- Extra Virgin Olive Oil (1/4 cup / 60ml): Enriches the sauce, adding a smooth mouthfeel and a fruity, peppery undertone.
- Lemon Juice (2 tablespoons, freshly squeezed): A crucial element that brightens all the flavors and adds a zesty, clean finish to the sauce.
- Salt (1 teaspoon, or to taste): Enhances all the other flavors in the dish.
- Black Pepper (1/2 teaspoon, freshly ground): Adds a touch of gentle heat and complexity.
- Red Pepper Flakes (1/4 teaspoon, optional): For those who enjoy a little extra kick of heat to contrast the cool, creamy sauce.
Instructions
Follow these detailed steps to assemble the Chilled Roasted Pepper Pasta Cups. The process is straightforward, involving three main stages: preparing the components, creating the sauce, and bringing it all together.
Step 1: Roast the Bell Peppers (if using fresh)
- Preheat your oven’s broiler to high.
- Cut the bell peppers in half lengthwise and remove the stems, seeds, and white membranes.
- Place the pepper halves, skin-side up, on a baking sheet lined with aluminum foil.
- Broil for 5-10 minutes, or until the skins are thoroughly blackened and blistered. Keep a close eye on them to prevent them from burning through.
- Once blackened, carefully remove the baking sheet from the oven. Immediately transfer the hot peppers to a bowl and cover it tightly with plastic wrap, or place them in a paper bag and seal it. Let them steam for 15-20 minutes. This process loosens the skin, making it incredibly easy to peel.
- Once cooled enough to handle, use your fingers to peel away the blackened skin. It should slip off easily. Discard the skins.
Step 2: Cook the Pasta
- Bring a large pot of heavily salted water to a rolling boil. Salting the water is the only chance you have to season the pasta itself, so be generous.
- Add the medium shell pasta and cook according to package directions until al dente. It’s important not to overcook the pasta, as it will soften slightly as it sits in the sauce. An al dente texture will hold up best.
- Once cooked, drain the pasta in a colander and rinse it briefly under cold running water. This stops the cooking process and removes some of the surface starch, preventing the pasta from clumping together as it cools.
- Set the pasta aside to drain completely and cool down.
Step 3: Prepare the Creamy Roasted Pepper Sauce
- In the bowl of a food processor or a high-powered blender, combine the roasted red peppers, Greek yogurt, minced garlic, 1/4 cup of the fresh basil leaves, extra virgin olive oil, and fresh lemon juice.
- Pulse the mixture until it becomes smooth and creamy. You may need to scrape down the sides of the bowl a few times to ensure everything is well incorporated.
- Taste the sauce and season generously with salt, black pepper, and the optional red pepper flakes. Blend again briefly to combine. The sauce should be vibrant orange-red, fragrant, and bursting with flavor.
Step 4: Combine and Chill
- In a large mixing bowl, combine the cooled pasta, the creamy roasted pepper sauce, the crumbled feta cheese, and the remaining 1/4 cup of fresh basil (you can tear or roughly chop the leaves).
- Gently fold everything together until the pasta is evenly coated with the sauce and the feta and basil are distributed throughout. Be careful not to overmix, which can break down the feta too much.
- Cover the bowl with plastic wrap and transfer it to the refrigerator to chill for at least 2 hours. This step is crucial! Chilling allows the flavors to meld and deepen, resulting in a much more delicious final product. For best results, let it chill for 4 hours or even overnight.
Step 5: Serve
- Once chilled, give the pasta salad a final stir. If it seems a little thick (the pasta will absorb some of the sauce), you can stir in a tablespoon of Greek yogurt or a drizzle of olive oil to loosen it.
- Spoon the chilled pasta salad into individual serving vessels like small cups, glasses, or muffin tin liners.
- Garnish with extra crumbled feta, a fresh basil leaf, and a light dusting of black pepper before serving.
Nutrition
- Serving Size: one normal portion
- Calories: 250


