

Okay, settle in, because I have to tell you about these Chicken and Rice Casserole Cups. For the longest time, I’ve been on a quest for a meal that ticks all the boxes: easy to make, universally loved by the family (including the notoriously picky eaters), perfect for meal prep, and something that feels both comforting and a little bit special. Traditional casseroles are great, but sometimes portion control can be tricky, and let’s be honest, they don’t always present beautifully for guests or even just a fun family dinner. Then, these little marvels entered my life. The first time I made them, my kitchen was filled with the most incredible aroma – savory chicken, creamy rice, and melting cheese. My youngest, who usually inspects every morsel on his plate with suspicion, actually asked for seconds! My teenager, who often defaults to “it’s okay,” genuinely enthused about how “cool” they were in their individual portions. And my partner? He was thrilled with how easily they packed for lunch the next day. These Chicken and Rice Casserole Cups aren’t just a recipe; they’ve become a staple, a go-to for busy weeknights, a crowd-pleaser for casual get-togethers, and a testament to how simple ingredients can come together to create something truly delightful. They offer the nostalgic comfort of a classic casserole but in a perfectly portioned, endlessly customizable, and utterly charming format.
Ingredients
Here’s what you’ll need to create these delightful Chicken and Rice Casserole Cups. Each ingredient plays a crucial role in building the flavor and texture of these comforting bites.
- 2 cups cooked chicken, shredded or diced: Use rotisserie chicken for ultimate convenience, or cook 1 lb of boneless, skinless chicken breasts (boiled, baked, or pan-fried) and then shred or dice. This is the protein powerhouse of the dish.
- 1 ½ cups cooked rice: White rice, brown rice, or even wild rice works well. Leftover rice is perfect for this recipe! The rice provides a hearty and satisfying base.
- 1 can (10.5 ounces) condensed cream of chicken soup: This is a classic casserole binder, adding creaminess and savory flavor. You can also use cream of mushroom or cream of celery for a different flavor profile.
- ½ cup sour cream or plain Greek yogurt: Adds extra creaminess and a slight tang to balance the richness. Greek yogurt is a lighter, protein-rich alternative.
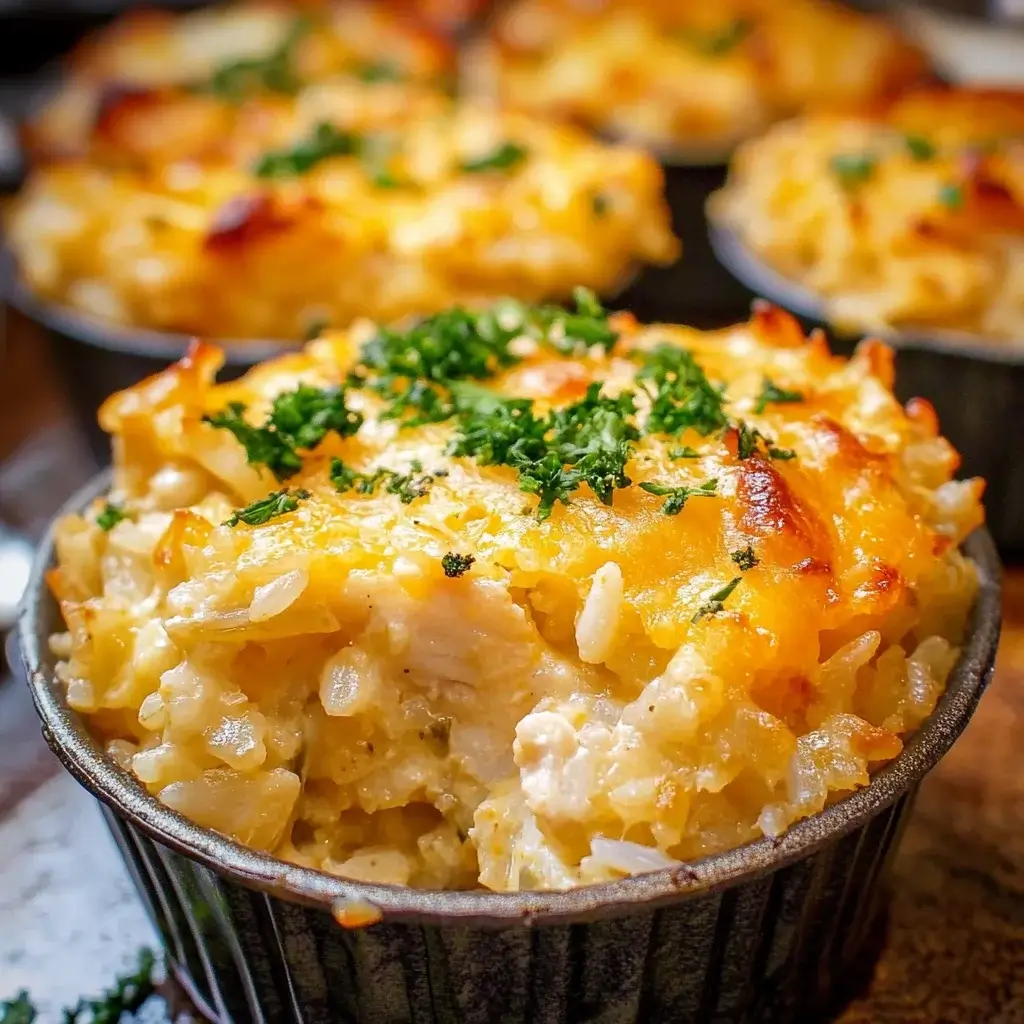
- 1 cup shredded cheddar cheese, divided: Or use a blend of your favorite melting cheeses like Monterey Jack, Colby, or a Mexican blend. Half will go into the mixture, and half will be sprinkled on top for a golden, cheesy crust.
- ½ cup frozen peas and carrots mix, thawed: Adds a pop of color, sweetness, and valuable nutrients. You can substitute with other finely diced vegetables like corn, broccoli florets, or bell peppers.
- ¼ cup finely chopped onion (yellow or white): Provides a foundational aromatic flavor. Sautéing the onion beforehand can enhance its sweetness, but it can also be added raw.
- 2 tablespoons chopped fresh parsley: Brings a touch of freshness and color. Dried parsley can be used (use 1 tablespoon if dried).
- ½ teaspoon garlic powder: For a savory, aromatic kick.
- ¼ teaspoon black pepper: Freshly ground is best for maximum flavor.
- Salt to taste: Adjust based on the saltiness of your cooked chicken and soup. Start with ¼ teaspoon and add more if needed after tasting the mixture.
- Cooking spray or melted butter: For greasing the muffin tin, ensuring the cups don’t stick.
Instructions
Follow these simple steps to create your delicious Chicken and Rice Casserole Cups. This recipe is designed to be straightforward, even for beginner cooks.
- Preheat Oven and Prepare Muffin Tin:
- Preheat your oven to 375°F (190°C). The moderate heat ensures the casserole cups cook through evenly and the cheese melts beautifully without burning.
- Generously grease a standard 12-cup muffin tin with cooking spray or melted butter. Pay special attention to the sides and bottom of each cup to prevent sticking. This step is crucial for easy removal of the casserole cups. If you have a silicone muffin pan, greasing might be less critical but is still recommended.
- Combine Wet and Dry Ingredients (Except Topping Cheese):
- In a large mixing bowl, combine the cooked, shredded chicken and cooked rice. Ensure the chicken is in bite-sized pieces and the rice is not clumpy. If using leftover rice that’s a bit dry, you can moisten it with a tablespoon of water or broth before adding.
- Add the condensed cream of chicken soup, sour cream (or Greek yogurt), ½ cup of the shredded cheddar cheese (reserving the other ½ cup for topping), thawed peas and carrots, finely chopped onion, fresh parsley, garlic powder, black pepper, and salt.
- Stir everything together thoroughly until well combined. Make sure all the ingredients are evenly distributed. Taste the mixture at this point and adjust seasonings (salt, pepper) if necessary. The mixture should be moist but not overly wet.
- Fill Muffin Cups:
- Divide the chicken and rice mixture evenly among the 12 prepared muffin cups. An ice cream scoop with a release mechanism works wonderfully for uniform portions, but a regular spoon will do just fine.
- Press the mixture down gently into each cup with the back of the spoon. This helps the cups hold their shape after baking and ensures they cook evenly. Don’t pack too tightly, though, as you want them to be tender. Fill each cup almost to the top.
- Top with Remaining Cheese:
- Sprinkle the remaining ½ cup of shredded cheddar cheese evenly over the top of each casserole cup. This will create a delicious, golden-brown, and bubbly cheese crust as it bakes. For an extra crispy topping, you can mix the cheese with a tablespoon or two of panko breadcrumbs before sprinkling.
- Bake the Casserole Cups:
- Place the muffin tin in the preheated oven.
- Bake for 20-25 minutes, or until the casserole cups are heated through, the edges are lightly browned, and the cheese on top is melted, bubbly, and golden. Cooking times may vary slightly depending on your oven and the initial temperature of your ingredients. If the tops start to brown too quickly, you can loosely tent the muffin tin with aluminum foil for the last 5-10 minutes of baking.
- Cool and Serve:
- Once baked, carefully remove the muffin tin from the oven.
- Let the Chicken and Rice Casserole Cups cool in the muffin tin for at least 5-10 minutes before attempting to remove them. This cooling period is important as it allows them to set and makes them easier to remove without falling apart.
- To remove, gently run a thin knife or a small offset spatula around the edge of each cup to loosen it, then carefully lift it out.
- Serve warm and enjoy!
Nutrition Facts
Understanding the nutritional profile of what you eat is key to maintaining a balanced diet. Here’s an approximate breakdown for these Chicken and Rice Casserole Cups:
- Servings: This recipe makes 12 individual casserole cups.
- Calories per serving (1 cup): Approximately 180-220 calories. (This is an estimate and can vary based on specific ingredients like the type of cheese, cream of soup, and whether you use full-fat sour cream or Greek yogurt.)
Key Nutrition Highlights (per serving):
- Protein (approx. 12-15g): Crucial for muscle repair, immune function, and satiety. The chicken is the primary source of high-quality protein in this dish.
- Carbohydrates (approx. 15-18g): Primarily from the rice and vegetables, providing essential energy for your body and brain.
- Fat (approx. 8-10g): Comes from the cheese, chicken, and sour cream/soup. Fats are important for hormone production and nutrient absorption. Opting for lower-fat cheese or Greek yogurt can reduce this.
- Sodium (approx. 350-450mg): Mainly from the condensed soup and added salt. If you’re watching your sodium intake, choose low-sodium soup and be mindful of added salt.
- Fiber (approx. 1-2g): From the vegetables and brown rice (if used). Fiber aids in digestion and helps maintain stable blood sugar levels. Using more vegetables or whole grain rice will increase fiber content.
Disclaimer: These are estimated values. Actual nutritional content will vary based on the specific brands and types of ingredients used, as well as precise portion sizes.
Preparation Time
Getting a delicious and comforting meal on the table doesn’t have to take all day. These Chicken and Rice Casserole Cups are designed with efficiency in mind, especially if you utilize pre-cooked components.
- Active Preparation Time: Approximately 15-20 minutes. This includes gathering your ingredients, shredding or dicing the cooked chicken (if not already done), chopping the onion, and mixing everything together. If you need to cook chicken or rice from scratch specifically for this recipe, that time will need to be added.
- Cooking Time (Baking): Approximately 20-25 minutes in the oven.
- Cooling Time: Approximately 5-10 minutes before serving. This allows the casserole cups to set properly.
Total Time (excluding cooking chicken/rice from scratch): Approximately 40-55 minutes from start to when they are ready to be served.
This relatively short total time makes these casserole cups an excellent option for weeknight dinners or when you need a quick yet satisfying meal. Using pre-cooked rotisserie chicken and leftover rice significantly cuts down the active prep time, bringing it closer to the 15-minute mark.
How to Serve
These versatile Chicken and Rice Casserole Cups can be served in a variety of ways, making them suitable for different occasions and preferences. Their individual portion sizes make them inherently appealing and easy to handle.
- As a Main Course:
- Serve 2-3 cups per person for a satisfying main meal.
- Pair with a Fresh Green Salad: A simple side salad with a light vinaigrette dressing offers a refreshing contrast to the creamy casserole. Think mixed greens, cherry tomatoes, cucumbers, and a sprinkle of nuts or seeds.
- Serve alongside Steamed Vegetables: Broccoli, green beans, asparagus, or a colorful medley of steamed vegetables make for a healthy and balanced plate.
- With a Side of Fruit: A small bowl of fresh fruit salad or a few apple slices can add a touch of sweetness and lightness.
- For Lunchboxes:
- These cups are fantastic for packed lunches for both kids and adults. They hold their shape well and can be eaten cold, at room temperature, or reheated.
- Pack one or two cups with some fruit, vegetable sticks (like carrots or celery with hummus), and a small yogurt or cheese stick for a complete lunch.
- As an Appetizer or Party Food:
- Their mini size makes them perfect for gatherings, potlucks, or as part of a buffet.
- Arrange them on a platter and garnish with a tiny sprig of fresh parsley or a sprinkle of paprika on each cup for visual appeal.
- Offer a small dipping sauce on the side, like a light ranch dressing or a zesty tomato salsa, though they are flavorful enough on their own.
- Kid-Friendly Meal:
- The individual portions are perfect for little hands and appetites.
- Serve with fun-shaped fruit or a small dipping cup of ketchup (if your kids enjoy it).
- Their familiar flavors of chicken, rice, and cheese are generally very well-received by children.
- Garnish Options for Enhanced Presentation:
- Fresh Herbs: A sprinkle of freshly chopped chives, dill, or more parsley just before serving adds a burst of color and freshness.
- Paprika: A light dusting of smoked or sweet paprika on top of the melted cheese enhances the color and adds a subtle smoky flavor.
- A Dollop of Sour Cream or Greek Yogurt: For an extra touch of creaminess and a tangy counterpoint, especially if serving warm.
- Hot Sauce: For those who like a bit of spice, a few dashes of your favorite hot sauce can be a great addition.
No matter how you choose to serve them, these Chicken and Rice Casserole Cups are sure to be a hit, offering comfort, convenience, and deliciousness in every bite.
Additional Tips
To make your Chicken and Rice Casserole Cups even better, or to tailor them to your specific needs and preferences, here are eight additional tips:
- Vary Your Veggies: Don’t feel limited to peas and carrots! Finely chopped broccoli florets, corn kernels, diced bell peppers (any color), sautéed mushrooms, or even drained and chopped spinach can be wonderful additions or substitutions. Adding more vegetables boosts the nutritional value and flavor complexity. Aim for about ½ to ¾ cup of total mixed vegetables.
- Spice It Up or Down: For a spicier kick, add a pinch of cayenne pepper, red pepper flakes, or a dash of your favorite hot sauce to the mixture. For a different flavor profile, try incorporating herbs like dried thyme, rosemary, or a pinch of curry powder. If making for sensitive palates, ensure seasonings like garlic powder and pepper are used moderately.
- Cheese Choices Abound: While cheddar is a classic, feel free to experiment. Monterey Jack, Colby, Pepper Jack (for a kick), Gruyère (for a nuttier flavor), or a blend of Italian cheeses can all work beautifully. Using a good quality, flavorful cheese will significantly enhance the dish.
- Make-Ahead Magic: You can assemble the casserole cups in the muffin tin, cover them tightly with plastic wrap or foil, and refrigerate for up to 24 hours before baking. You might need to add 5-10 minutes to the baking time if baking directly from cold. This is a fantastic feature for meal prepping or getting ahead for a busy day.
- Freezer-Friendly Portions: These casserole cups freeze exceptionally well. After baking and cooling completely, you can remove them from the muffin tin, wrap each cup individually in plastic wrap and then foil, or place them in a freezer-safe container or bag. They can be frozen for up to 2-3 months. To reheat, thaw overnight in the refrigerator and bake at 350°F (175°C) until heated through, or microwave until warm.
- Rice Variations: While standard white or brown rice works perfectly, consider using other types of rice for different textures and flavors. Basmati or jasmine rice will add a fragrant note. Arborio rice, if pre-cooked, can lend an extra creamy texture. For a healthier, chewier option, try quinoa (though technically a seed, it behaves like a grain here).
- Crunchy Topping Option: For an added textural contrast, mix ½ cup of panko breadcrumbs or crushed buttery crackers (like Ritz) with 2 tablespoons of melted butter and sprinkle this mixture over the cheese before baking. This will create an extra crispy and golden topping.
- Low-Carb Adaptations: If you’re looking to reduce carbohydrates, you can substitute the rice with finely riced cauliflower. Ensure the cauliflower rice is pre-cooked (steamed or sautéed) and excess moisture is squeezed out to prevent the cups from becoming watery. This will change the texture and flavor but offers a good lower-carb alternative.
By incorporating these tips, you can customize the Chicken and Rice Casserole Cups to perfectly suit your taste and dietary needs, making this already fantastic recipe even more versatile.
FAQ Section
Here are answers to some frequently asked questions about making Chicken and Rice Casserole Cups:
1. Can I use leftover chicken and rice for this recipe?
- Answer: Absolutely! This recipe is perfect for using up leftover cooked chicken (like rotisserie chicken or last night’s baked chicken) and leftover cooked rice. It’s a fantastic way to reduce food waste and create a delicious new meal from remnants. Just ensure the chicken is shredded or diced into bite-sized pieces.
2. My casserole cups are sticking to the muffin tin. What can I do?
- Answer: The key to preventing sticking is to grease the muffin tin very well. Use cooking spray, melted butter, or even shortening, making sure to coat the bottom and all sides of each cup thoroughly. If they do stick, let them cool for a few extra minutes (5-10) in the pan, as this can help them release. Then, gently run a thin, flexible knife or a small offset spatula around the edges of each cup to loosen it before trying to lift it out. Silicone muffin pans are also a great option as they are naturally non-stick.
3. Can I make these gluten-free?
- Answer: Yes, you can easily make these gluten-free. Ensure your cooked chicken and rice are gluten-free (rice naturally is). The main ingredient to check is the condensed cream of chicken soup. Many brands contain wheat. Look for a specifically labeled gluten-free cream of chicken soup, or you can make a simple homemade white sauce (béchamel) with gluten-free flour, butter, milk, and chicken broth as a substitute.
4. How do I store and reheat leftover casserole cups?
- Answer: Store leftover casserole cups in an airtight container in the refrigerator for up to 3-4 days. To reheat, you can place them on a baking sheet and warm them in a 350°F (175°C) oven for about 10-15 minutes, or until heated through. Alternatively, you can microwave individual cups for 1-2 minutes, but be aware that microwaving can sometimes make the texture a bit softer.
5. Can I use different types of condensed soup?
- Answer: Yes, definitely! While cream of chicken soup is classic, cream of mushroom, cream of celery, or even cheddar cheese soup would also work well and provide slightly different flavor profiles. Choose one that complements the chicken and rice. For a homemade touch, you could also make your own creamy base sauce.
6. What if I don’t have sour cream or Greek yogurt?
- Answer: If you don’t have sour cream or Greek yogurt, you could substitute with an equal amount of mayonnaise for richness (though it will alter the flavor slightly), cream cheese (softened and perhaps thinned with a little milk), or even a bit more condensed soup. The goal is to add moisture and creaminess, so consider what you have on hand that can achieve that.
7. How do I know when the casserole cups are fully cooked?
- Answer: The casserole cups are fully cooked when they are heated through, the cheese on top is melted, bubbly, and golden brown, and the edges might be slightly browned and pulling away from the sides of the muffin cups. Since the chicken and rice are already cooked, you’re primarily heating everything through and melting the cheese. A good visual cue is the bubbling around the edges and the golden top. Internal temperature should reach 165°F (74°C) if you’re using a thermometer.
8. Can I make a larger batch by doubling the recipe?
- Answer: Yes, you can easily double or even triple the recipe if you need to feed a crowd or want more leftovers. You will need multiple muffin tins or to bake in batches. Ensure you have a large enough mixing bowl to combine all the ingredients evenly. The baking time should remain approximately the same, provided you are not overcrowding your oven, which can lower the temperature and increase bake time.

Chicken and Rice Casserole Cups
Ingredients
Here’s what you’ll need to create these delightful Chicken and Rice Casserole Cups. Each ingredient plays a crucial role in building the flavor and texture of these comforting bites.
- 2 cups cooked chicken, shredded or diced: Use rotisserie chicken for ultimate convenience, or cook 1 lb of boneless, skinless chicken breasts (boiled, baked, or pan-fried) and then shred or dice. This is the protein powerhouse of the dish.
- 1 ½ cups cooked rice: White rice, brown rice, or even wild rice works well. Leftover rice is perfect for this recipe! The rice provides a hearty and satisfying base.
- 1 can (10.5 ounces) condensed cream of chicken soup: This is a classic casserole binder, adding creaminess and savory flavor. You can also use cream of mushroom or cream of celery for a different flavor profile.
- ½ cup sour cream or plain Greek yogurt: Adds extra creaminess and a slight tang to balance the richness. Greek yogurt is a lighter, protein-rich alternative.
- 1 cup shredded cheddar cheese, divided: Or use a blend of your favorite melting cheeses like Monterey Jack, Colby, or a Mexican blend. Half will go into the mixture, and half will be sprinkled on top for a golden, cheesy crust.
- ½ cup frozen peas and carrots mix, thawed: Adds a pop of color, sweetness, and valuable nutrients. You can substitute with other finely diced vegetables like corn, broccoli florets, or bell peppers.
- ¼ cup finely chopped onion (yellow or white): Provides a foundational aromatic flavor. Sautéing the onion beforehand can enhance its sweetness, but it can also be added raw.
- 2 tablespoons chopped fresh parsley: Brings a touch of freshness and color. Dried parsley can be used (use 1 tablespoon if dried).
- ½ teaspoon garlic powder: For a savory, aromatic kick.
- ¼ teaspoon black pepper: Freshly ground is best for maximum flavor.
- Salt to taste: Adjust based on the saltiness of your cooked chicken and soup. Start with ¼ teaspoon and add more if needed after tasting the mixture.
- Cooking spray or melted butter: For greasing the muffin tin, ensuring the cups don’t stick.
Instructions
Follow these simple steps to create your delicious Chicken and Rice Casserole Cups. This recipe is designed to be straightforward, even for beginner cooks.
- Preheat Oven and Prepare Muffin Tin:
- Preheat your oven to 375°F (190°C). The moderate heat ensures the casserole cups cook through evenly and the cheese melts beautifully without burning.
- Generously grease a standard 12-cup muffin tin with cooking spray or melted butter. Pay special attention to the sides and bottom of each cup to prevent sticking. This step is crucial for easy removal of the casserole cups. If you have a silicone muffin pan, greasing might be less critical but is still recommended.
- Combine Wet and Dry Ingredients (Except Topping Cheese):
- In a large mixing bowl, combine the cooked, shredded chicken and cooked rice. Ensure the chicken is in bite-sized pieces and the rice is not clumpy. If using leftover rice that’s a bit dry, you can moisten it with a tablespoon of water or broth before adding.
- Add the condensed cream of chicken soup, sour cream (or Greek yogurt), ½ cup of the shredded cheddar cheese (reserving the other ½ cup for topping), thawed peas and carrots, finely chopped onion, fresh parsley, garlic powder, black pepper, and salt.
- Stir everything together thoroughly until well combined. Make sure all the ingredients are evenly distributed. Taste the mixture at this point and adjust seasonings (salt, pepper) if necessary. The mixture should be moist but not overly wet.
- Fill Muffin Cups:
- Divide the chicken and rice mixture evenly among the 12 prepared muffin cups. An ice cream scoop with a release mechanism works wonderfully for uniform portions, but a regular spoon will do just fine.
- Press the mixture down gently into each cup with the back of the spoon. This helps the cups hold their shape after baking and ensures they cook evenly. Don’t pack too tightly, though, as you want them to be tender. Fill each cup almost to the top.
- Top with Remaining Cheese:
- Sprinkle the remaining ½ cup of shredded cheddar cheese evenly over the top of each casserole cup. This will create a delicious, golden-brown, and bubbly cheese crust as it bakes. For an extra crispy topping, you can mix the cheese with a tablespoon or two of panko breadcrumbs before sprinkling.
- Bake the Casserole Cups:
- Place the muffin tin in the preheated oven.
- Bake for 20-25 minutes, or until the casserole cups are heated through, the edges are lightly browned, and the cheese on top is melted, bubbly, and golden. Cooking times may vary slightly depending on your oven and the initial temperature of your ingredients. If the tops start to brown too quickly, you can loosely tent the muffin tin with aluminum foil for the last 5-10 minutes of baking.
- Cool and Serve:
- Once baked, carefully remove the muffin tin from the oven.
- Let the Chicken and Rice Casserole Cups cool in the muffin tin for at least 5-10 minutes before attempting to remove them. This cooling period is important as it allows them to set and makes them easier to remove without falling apart.
- To remove, gently run a thin knife or a small offset spatula around the edge of each cup to loosen it, then carefully lift it out.
- Serve warm and enjoy!
Nutrition
- Serving Size: one normal portion
- Calories: 220
- Sodium: 450mg
- Fat: 10g
- Carbohydrates: 18g
- Fiber: 2g
- Protein: 15g


