
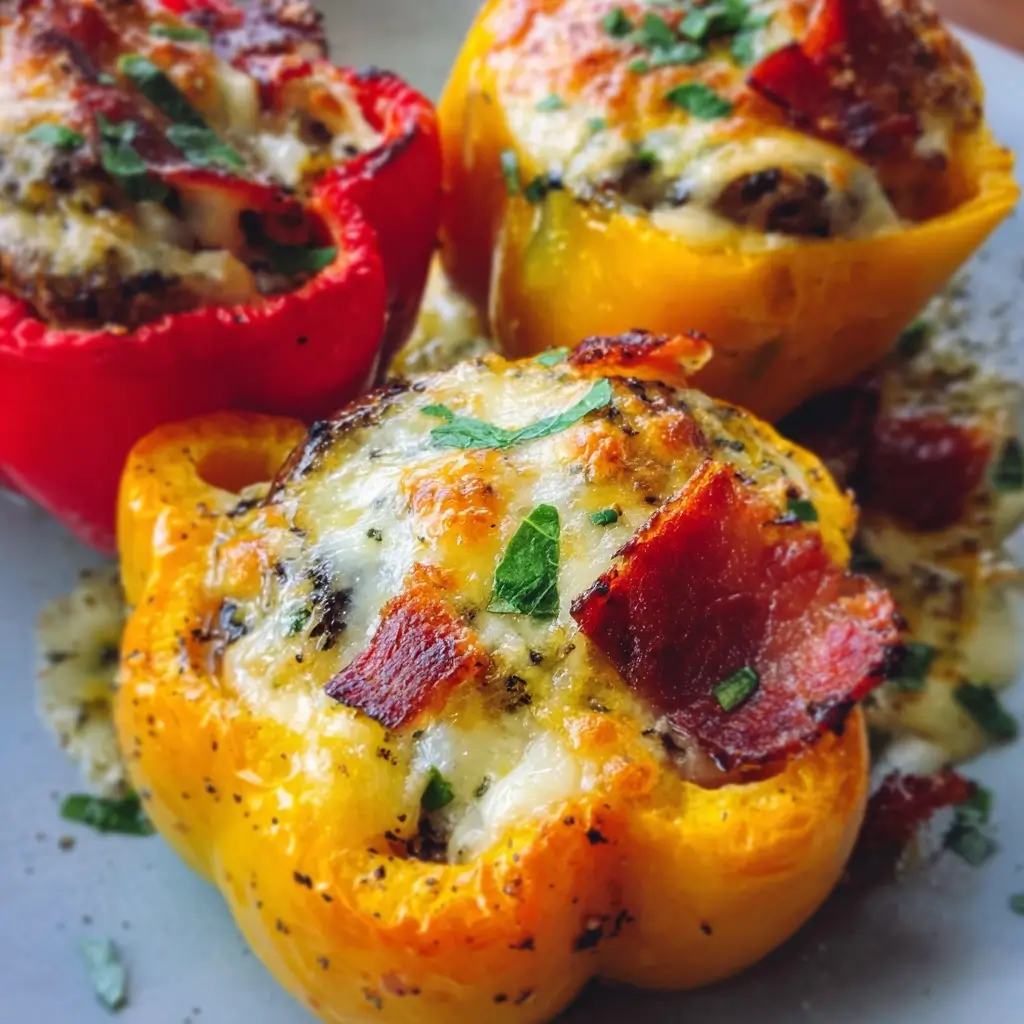

Of all the breakfast transformations my kitchen has seen over the years, none have been as universally celebrated as the morning we first tried these Breakfast Stuffed Bell Peppers. I was searching for something that could break us out of our weekend rut of pancakes and cereal—something savory, colorful, and packed with enough goodness to fuel a busy day. The moment I pulled these vibrant, jewel-toned peppers from the oven, glistening and fragrant, I knew I had a winner. The aroma of seasoned beef, savory ham, and melting cheese filled the air, and my family gathered around the counter, intrigued. The first bite was a revelation: the sweetness of the tender-crisp pepper, the hearty and flavorful filling, and the perfectly cooked egg with its rich, golden yolk tying everything together. It was an instant hit, and has since become our go-to for special brunches, leisurely weekends, and even a make-ahead meal prep solution for hectic weekday mornings. This recipe isn’t just food; it’s an experience that turns an ordinary breakfast into a memorable meal.
Ingredients
- 4 large bell peppers: Use a mix of colors like red, yellow, and orange for a stunning visual presentation and a range of sweet flavors.
- 1 lb lean ground beef: Forms the hearty, protein-packed base of the savory filling.
- 1/2 cup diced ham: Adds a wonderfully smoky and salty flavor that complements the beef and eggs perfectly.
- 1 small yellow onion, finely chopped: Provides a foundational layer of sweet, aromatic flavor to the filling.
- 2 cloves garlic, minced: Infuses the mixture with a pungent, savory depth that elevates all the other ingredients.
- 1 cup shredded sharp cheddar cheese, divided: Melts into the filling for a creamy texture and provides a delicious golden-brown crust on top.
- 4 large eggs: One for each pepper, creating a classic breakfast element and a rich, saucy yolk.
- 2 tablespoons olive oil: Used for sautéing the aromatics and preparing the peppers, adding a hint of fruity richness.
- 1 teaspoon dried oregano: Lends a classic, earthy, and slightly peppery Mediterranean note.
- 1/2 teaspoon smoked paprika: Adds a touch of smoky complexity and beautiful color to the beef mixture.
- Salt and black pepper to taste: Essential for seasoning the dish and bringing all the individual flavors into harmony.
- Fresh parsley or chives, chopped for garnish: Provides a final touch of fresh, herbaceous brightness.
Instructions
- Preheat and Prepare the Peppers: Begin by preheating your oven to 400°F (200°C). Wash the bell peppers thoroughly. Slice each pepper in half lengthwise, from the stem to the base. Carefully remove the seeds and white membranes from the inside. Lightly brush the inside and outside of each pepper half with olive oil and place them cut-side up in a 9×13 inch baking dish. Bake them for 15-20 minutes. This initial baking step is crucial; it helps to soften the peppers so they are perfectly tender and not unpleasantly crunchy in the final dish.
- Cook the Filling: While the peppers are pre-baking, heat the remaining olive oil in a large skillet or pan over medium-high heat. Add the chopped yellow onion and cook until it becomes soft and translucent, which should take about 3-4 minutes. Add the minced garlic and cook for another minute until it is fragrant, being careful not to let it burn.
- Brown the Meats: Add the lean ground beef to the skillet with the onions and garlic. Use a wooden spoon or spatula to break up the meat as it cooks. Cook until the beef is thoroughly browned and no pink remains. It’s important to drain off any excess fat from the skillet at this stage to ensure your filling isn’t greasy. Return the skillet to the heat and add the diced ham, cooking for another 2-3 minutes to heat it through and allow its savory flavor to meld with the beef.
- Season and Combine: Stir the smoked paprika, dried oregano, salt, and pepper into the meat mixture. Let the seasonings cook for a minute to bloom their flavors. Turn off the heat and stir in half (1/2 cup) of the shredded cheddar cheese. The residual heat will help the cheese melt slightly, creating a wonderfully cohesive and creamy filling.
- Stuff the Peppers: By now, your peppers should be done with their pre-bake. Carefully remove the baking dish from the oven. Using a spoon, divide the savory beef and ham mixture evenly among the eight bell pepper halves. Pack the filling in, but be sure to leave a small well or indentation in the center of each one. This space is where the egg will sit.
- Add the Eggs: Gently crack one large egg into the well you created in each stuffed pepper half. The filling will act as a nest, holding the egg in place. Season the top of each egg with a little more salt and pepper.
- Final Bake: Sprinkle the remaining 1/2 cup of shredded cheddar cheese over the peppers, focusing on the filling around the egg. Carefully return the baking dish to the oven. Bake for another 15-20 minutes. The exact time will depend on how you like your eggs. For a runny, jammy yolk, aim for around 15 minutes. For a firmer, fully-cooked yolk, let them bake closer to the 20-minute mark. The peppers are done when the egg whites are completely set and the cheese is melted and beautifully golden brown.
- Rest and Garnish: Once baked to perfection, remove the dish from the oven. Let the stuffed peppers rest for about 5 minutes. This allows them to cool slightly and for the fillings to set, making them easier to serve. Garnish generously with freshly chopped parsley or chives before serving.
Nutrition Facts
- Servings: 4 (two pepper halves per serving)
- Calories per serving: Approximately 550 kcal
- High in Protein: This dish is a protein powerhouse, primarily from the ground beef, ham, eggs, and cheese. Protein is vital for building and repairing tissues, and it provides excellent satiety, keeping you feeling full and energized throughout the morning.
- Rich in Vitamins: Bell peppers are an excellent source of Vitamin C (especially red peppers) and Vitamin A. These vitamins are crucial for immune function, skin health, and vision.
- Low in Carbohydrates: With the primary ingredients being meat, eggs, cheese, and low-carb vegetables, this recipe is naturally low in carbohydrates, making it a fantastic option for those following a low-carb or ketogenic lifestyle.
- Source of Healthy Fats: The olive oil and the natural fats present in the beef and cheese provide energy and help your body absorb fat-soluble vitamins like A, D, E, and K.
- Packed with Iron: Ground beef is a significant source of heme iron, a type of iron that is easily absorbed by the body. Iron is essential for creating red blood cells and preventing fatigue.
Preparation Time
This recipe takes approximately 25 minutes of active preparation time for chopping vegetables and cooking the filling, and a total cooking time of 30-40 minutes in the oven. The total time from start to finish is around one hour, but much of this is hands-off baking time, giving you a chance to prepare other parts of your meal or enjoy a cup of coffee.
How to Serve
These Breakfast Stuffed Bell Peppers are a complete meal on their own, but they can be elevated with creative serving suggestions to suit any occasion, from a simple family breakfast to an elegant brunch.
- As a Standalone Star:
- Serve two pepper halves per person on a plate.
- Let the vibrant colors of the peppers and the perfectly cooked egg be the main attraction.
- Garnish Generously:
- Fresh Herbs: A sprinkle of fresh cilantro, chives, or parsley adds a pop of color and fresh flavor that cuts through the richness.
- Creamy Toppings: A dollop of sour cream, plain Greek yogurt, or a few slices of fresh avocado adds a cool, creamy contrast.
- A Touch of Heat: For those who like a kick, serve with your favorite hot sauce, a sprinkle of red pepper flakes, or some sliced jalapeños on the side.
- Pair with Complementary Sides:
- For a Classic Breakfast Feel: Serve alongside crispy breakfast potatoes, golden hash browns, or simple toast points for dipping into the runny egg yolk.
- For a Lighter Meal: A simple side salad with a light vinaigrette or a bowl of fresh fruit can balance the savory richness of the peppers.
- For a Hearty Brunch: Create a full brunch spread by adding a side of sliced cantaloupe, a yogurt parfait, and a basket of warm croissants.
- Presentation for a Crowd:
- Arrange all the cooked pepper halves on a large wooden board or ceramic platter for a beautiful, rustic family-style presentation.
- Allow guests to choose their own garnishes by setting up a small “toppings bar” with bowls of sour cream, salsa, chopped onions, and fresh herbs.
Additional Tips
- Choose Your Peppers Wisely: The color of the bell pepper affects the taste. Red, yellow, and orange peppers are sweeter and are generally preferred for this recipe. Green bell peppers have a more bitter, grassy flavor, which can still be delicious if you enjoy that taste profile. Look for peppers that are large and have a relatively flat bottom so they sit steadily in the baking dish.
- Don’t Skip the Pre-Bake: Pre-baking the peppers before stuffing them is a game-changer. It ensures they become tender and sweet, rather than remaining hard and raw-tasting. If you like your peppers with more of a crisp-tender bite, you can reduce the pre-baking time to 10-12 minutes.
- Customize Your Filling: This recipe is incredibly versatile. Feel free to add other finely chopped vegetables to the beef mixture, such as mushrooms, spinach (wilted first), or zucchini. You can also swap the cheese. Pepper Jack would add a nice spice, while a smoked Gouda would enhance the smoky flavors.
- Master the Perfect Egg Yolk: The key to your preferred yolk consistency is timing. For a gloriously runny yolk perfect for dipping, check the peppers at the 15-minute mark of the final bake. For a softer, jammy yolk, go for 17-18 minutes. For a completely firm, hard-cooked yolk, bake for the full 20-25 minutes.
- Embrace Meal Prep: You can do most of the work ahead of time. Cook the beef and ham filling completely and store it in an airtight container in the fridge for up to 3 days. You can also pre-slice and de-seed your peppers. When you’re ready to eat, simply stuff the peppers, crack the egg on top, and bake. This turns a weekend recipe into a feasible weekday breakfast.
- Avoid Watery Peppers: To prevent a pool of water at the bottom of your baking dish, ensure you thoroughly drain the fat from the ground beef after browning. Additionally, if you add vegetables with high water content like mushrooms or zucchini, it’s best to cook them down separately to release their moisture before adding them to the main filling.
- Cheese Strategy: For the best results, use the cheese in two stages as directed. Mixing half the cheese into the filling makes it creamy and helps it bind together. Sprinkling the other half on top before the final bake creates that irresistible, bubbly, golden-brown crust that everyone loves.
- Let Them Rest: It might be tempting to dive in right as they come out of the oven, but letting the stuffed peppers rest for 5 minutes is essential. This allows the molten cheese and the egg to set up slightly, preventing the filling from falling apart as you cut into it and making the first bite perfectly hot, not scalding.
Frequently Asked Questions (FAQ)
Q1: Can I make these Breakfast Stuffed Bell Peppers ahead of time?
A: Absolutely! This recipe is fantastic for meal prep. The best way to do this is to fully cook the meat filling and prepare the peppers (slice and de-seed). Store the filling and the pepper halves in separate airtight containers in the refrigerator for up to 3 days. When you’re ready to bake, simply fill the cold peppers with the cold filling, top with the egg and cheese, and bake. You may need to add 5-10 minutes to the baking time since you’re starting with cold ingredients.
Q2: How do I store and reheat leftovers?
A: Store any leftover stuffed peppers in an airtight container in the refrigerator for up to 3 days. The best way to reheat them is in the oven or an air fryer. Place them in a baking dish and heat at 350°F (175°C) for 10-15 minutes, or until warmed through. This method helps the pepper retain its texture and keeps the cheese bubbly. While you can use a microwave, be aware that it can make the pepper a bit soft and the egg can become rubbery.
Q3: Can I freeze these breakfast stuffed peppers?
A: Yes, you can, but with a slight modification. It’s best to freeze them before adding the egg. Follow the recipe through stuffing the peppers with the cooked meat and cheese mixture. At this point, place the stuffed pepper halves on a baking sheet and flash-freeze them for an hour. Then, transfer them to a freezer-safe bag or container. They can be frozen for up to 3 months. When ready to bake, place the frozen peppers in a baking dish, crack a fresh egg on top, and bake from frozen at 375°F (190°C), adding about 20-25 minutes to the total baking time.
Q4: Is this recipe low-carb and keto-friendly?
A: Yes, this recipe is naturally very low in carbohydrates and is an excellent choice for anyone following a keto or low-carb diet. Bell peppers are a low-glycemic vegetable, and the other main ingredients—ground beef, ham, eggs, and cheese—are virtually carb-free. To ensure it fits your macros, use full-fat cheese and a higher-fat ground beef if desired, and simply enjoy a filling, delicious, and compliant meal.
Q5: Can I make this recipe vegetarian?
A: Of course! To make a vegetarian version, simply omit the ground beef and ham. You can replace them with a hearty mixture of black beans and corn, sautéed mushrooms and spinach, or a plant-based ground “meat” alternative. If using black beans, season them well with cumin, chili powder, and paprika to create a flavorful base. The rest of the recipe remains the same and is equally delicious.
Q6: My peppers turned out watery at the bottom. What did I do wrong?
A: This is a common issue that is easy to fix. The water usually comes from two sources: the peppers themselves releasing moisture as they cook, or from not properly draining the meat filling. To prevent this, make sure you thoroughly drain all the excess liquid and fat from the skillet after cooking the ground beef. Additionally, the pre-baking step helps release some of the peppers’ initial water content. Patting the inside of the pre-baked peppers with a paper towel before stuffing can also help absorb excess moisture.
Q7: What is the best type of ground beef to use for this recipe?
A: Lean ground beef, such as 90/10 or 85/15, works best for this recipe. Because you’re cooking it down and draining the fat, you don’t need a very high-fat content. A leaner blend ensures the filling is meaty and flavorful without being overly greasy. If you only have a higher-fat ground beef on hand (like 80/20), just be extra diligent about draining off all the rendered fat before you add the other ingredients.
Q8: How can I get my kids to try these stuffed peppers?
A: To make this recipe more kid-friendly, focus on sweetness and involvement. Use the sweetest peppers you can find—red and orange are usually the biggest hits. You can also dice the onions very finely so they blend in seamlessly. The best trick is to get them involved in the process! Let them help stir the filling (with supervision) or sprinkle the cheese on top. When kids have a hand in making their food, they are much more likely to eat it. You can also assure them it’s like a “pizza in a pepper” or a “breakfast boat.”
Print
Breakfast Stuffed Bell Peppers
Ingredients
- 4 large bell peppers: Use a mix of colors like red, yellow, and orange for a stunning visual presentation and a range of sweet flavors.
- 1 lb lean ground beef: Forms the hearty, protein-packed base of the savory filling.
- 1/2 cup diced ham: Adds a wonderfully smoky and salty flavor that complements the beef and eggs perfectly.
- 1 small yellow onion, finely chopped: Provides a foundational layer of sweet, aromatic flavor to the filling.
- 2 cloves garlic, minced: Infuses the mixture with a pungent, savory depth that elevates all the other ingredients.
- 1 cup shredded sharp cheddar cheese, divided: Melts into the filling for a creamy texture and provides a delicious golden-brown crust on top.
- 4 large eggs: One for each pepper, creating a classic breakfast element and a rich, saucy yolk.
- 2 tablespoons olive oil: Used for sautéing the aromatics and preparing the peppers, adding a hint of fruity richness.
- 1 teaspoon dried oregano: Lends a classic, earthy, and slightly peppery Mediterranean note.
- 1/2 teaspoon smoked paprika: Adds a touch of smoky complexity and beautiful color to the beef mixture.
- Salt and black pepper to taste: Essential for seasoning the dish and bringing all the individual flavors into harmony.
- Fresh parsley or chives, chopped for garnish: Provides a final touch of fresh, herbaceous brightness.
Instructions
- Preheat and Prepare the Peppers: Begin by preheating your oven to 400°F (200°C). Wash the bell peppers thoroughly. Slice each pepper in half lengthwise, from the stem to the base. Carefully remove the seeds and white membranes from the inside. Lightly brush the inside and outside of each pepper half with olive oil and place them cut-side up in a 9×13 inch baking dish. Bake them for 15-20 minutes. This initial baking step is crucial; it helps to soften the peppers so they are perfectly tender and not unpleasantly crunchy in the final dish.
- Cook the Filling: While the peppers are pre-baking, heat the remaining olive oil in a large skillet or pan over medium-high heat. Add the chopped yellow onion and cook until it becomes soft and translucent, which should take about 3-4 minutes. Add the minced garlic and cook for another minute until it is fragrant, being careful not to let it burn.
- Brown the Meats: Add the lean ground beef to the skillet with the onions and garlic. Use a wooden spoon or spatula to break up the meat as it cooks. Cook until the beef is thoroughly browned and no pink remains. It’s important to drain off any excess fat from the skillet at this stage to ensure your filling isn’t greasy. Return the skillet to the heat and add the diced ham, cooking for another 2-3 minutes to heat it through and allow its savory flavor to meld with the beef.
- Season and Combine: Stir the smoked paprika, dried oregano, salt, and pepper into the meat mixture. Let the seasonings cook for a minute to bloom their flavors. Turn off the heat and stir in half (1/2 cup) of the shredded cheddar cheese. The residual heat will help the cheese melt slightly, creating a wonderfully cohesive and creamy filling.
- Stuff the Peppers: By now, your peppers should be done with their pre-bake. Carefully remove the baking dish from the oven. Using a spoon, divide the savory beef and ham mixture evenly among the eight bell pepper halves. Pack the filling in, but be sure to leave a small well or indentation in the center of each one. This space is where the egg will sit.
- Add the Eggs: Gently crack one large egg into the well you created in each stuffed pepper half. The filling will act as a nest, holding the egg in place. Season the top of each egg with a little more salt and pepper.
- Final Bake: Sprinkle the remaining 1/2 cup of shredded cheddar cheese over the peppers, focusing on the filling around the egg. Carefully return the baking dish to the oven. Bake for another 15-20 minutes. The exact time will depend on how you like your eggs. For a runny, jammy yolk, aim for around 15 minutes. For a firmer, fully-cooked yolk, let them bake closer to the 20-minute mark. The peppers are done when the egg whites are completely set and the cheese is melted and beautifully golden brown.
- Rest and Garnish: Once baked to perfection, remove the dish from the oven. Let the stuffed peppers rest for about 5 minutes. This allows them to cool slightly and for the fillings to set, making them easier to serve. Garnish generously with freshly chopped parsley or chives before serving.
Nutrition
- Serving Size: one normal portion
- Calories: 550


