

I still remember the first time I stumbled upon the concept of a 3-ingredient chocolate tart. It sounded almost too good to be true. How could something so decadent, so elegant-looking, require only three simple components? Skepticism warred with curiosity. As someone who loves baking but doesn’t always have hours to spare (or a pantry stocked with exotic ingredients), the promise was alluring. I decided to give it a try for a casual Sunday family dinner, thinking if it flopped, we’d just have ice cream. The preparation was almost laughably simple – crushing cookies, melting chocolate and cream. As it chilled in the fridge, its glossy surface hinting at the richness beneath, anticipation grew. When I finally sliced into it, the knife glided through the silky ganache, meeting the gentle resistance of the cookie crust. That first bite was pure revelation. Rich, intensely chocolatey, smooth as velvet, with that delightful textural contrast from the base. My family was stunned. “You made this? With just three things?!” became the refrain around the table. It wasn’t just dessert; it became a conversation piece, a testament to the magic of simplicity. Since that day, this 3-Ingredient Chocolate Tart has become my secret weapon – my go-to for potlucks, last-minute guest arrivals, or simply when a serious chocolate craving hits. It never fails to impress, and the secret to its success remains delightfully uncomplicated. It proves, deliciously, that you don’t need complexity to achieve culinary perfection.
Ingredients
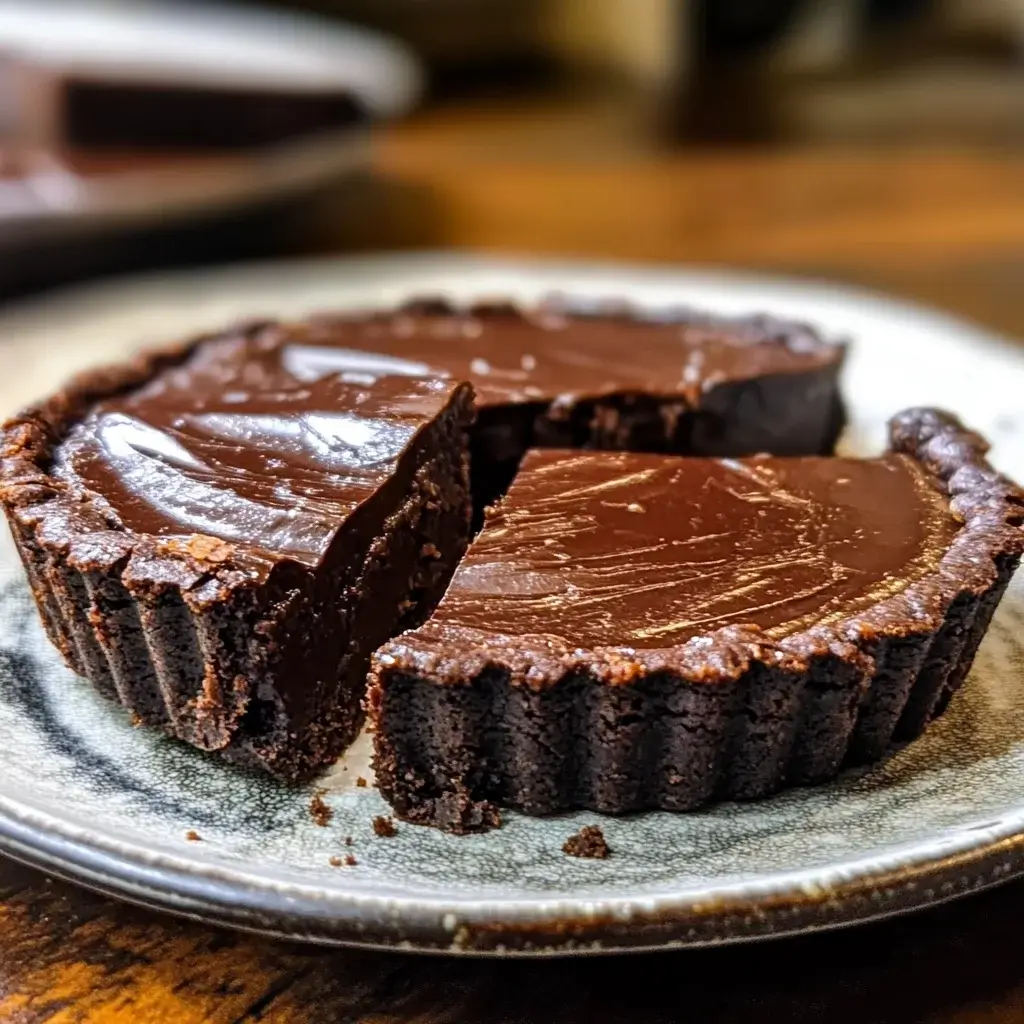
- 2 cups (about 240g or 8.5 oz) Chocolate Sandwich Cookies (like Oreos): These form the no-bake crust, providing structure, sweetness, and a deep chocolate flavour. Ensure you use the whole cookie, filling and all, for the best flavour and binding.
- 1 ½ cups (360ml or 12 fl oz) Heavy Cream (at least 35% fat): This is the key to a rich, smooth, and stable ganache filling. The high fat content ensures it whips up (if desired for topping, though not required for the filling itself) and sets properly when combined with the chocolate. Do not substitute with lower-fat cream or milk, as the ganache won’t set correctly.
- 12 oz (about 340g) Good Quality Semi-Sweet Chocolate: This is the star of the show. Using good quality chocolate (bars or chips/callets designed for melting) with around 50-60% cacao content provides a balanced, rich flavour that’s not overly sweet or bitter. Finely chopping the chocolate ensures it melts evenly and smoothly when the hot cream is added.
Instructions
- Prepare the Crust: Place the chocolate sandwich cookies (whole, including the filling) into the bowl of a food processor. Pulse several times until the cookies are broken down, then process continuously until they form fine crumbs. If you don’t have a food processor, place the cookies in a sturdy, sealed plastic bag and crush them thoroughly with a rolling pin until they are very fine – consistency is key for the crust holding together.
- Form the Crust: Transfer the fine cookie crumbs into a 9-inch tart pan with a removable bottom. This type of pan is highly recommended as it makes removing the finished tart much easier and cleaner. Press the crumbs firmly and evenly onto the bottom and up the sides of the tart pan. Use the flat bottom of a measuring cup or glass to help create a compact and even layer. Pay special attention to the edges and the corner where the base meets the sides, ensuring it’s well-packed to prevent crumbling later.
- Chill the Crust: Place the tart pan with the pressed crust into the freezer for at least 15-20 minutes (or the refrigerator for 30-40 minutes) while you prepare the filling. Chilling the crust helps it firm up and hold its shape better when the warm ganache filling is added. This step prevents the crust from becoming soggy or mixing with the filling.
- Prepare the Chocolate: While the crust is chilling, finely chop the semi-sweet chocolate. If using chocolate chips, they may not need chopping, but chopping larger bars ensures faster, more even melting. Place the chopped chocolate into a medium-sized heatproof bowl. Set aside. Consistency in chopping size is important for a smooth melt.
- Heat the Cream: Pour the heavy cream into a small saucepan. Heat the cream over medium heat, stirring occasionally to prevent scorching on the bottom. Bring the cream just to a simmer – you’ll see small bubbles forming around the edges of the pan. Do not let it come to a rolling boil, as excessively hot cream can sometimes cause the chocolate to seize or separate.
- Make the Ganache: Carefully pour the hot heavy cream directly over the chopped chocolate in the heatproof bowl. Let it sit undisturbed for 5 minutes. This allows the heat from the cream to gently melt the chocolate without agitation, which helps prevent air bubbles and ensures a smoother ganache.
- Stir the Ganache: After 5 minutes, start stirring the mixture slowly from the center with a whisk or spatula. Gradually widen your stirring motion outwards. Continue to stir gently and patiently until the chocolate is completely melted and the mixture is smooth, glossy, and homogenous. It might look split or uneven at first, but keep stirring gently, and it should come together into a beautiful, silky ganache. Avoid vigorous whisking, which can incorporate air and dull the glossy finish.
- Cool Slightly (Optional but Recommended): Let the ganache cool in the bowl for about 5-10 minutes at room temperature. This slight cooling helps prevent the warm ganache from melting the crust too much upon contact, further ensuring a distinct crust layer.
- Assemble the Tart: Retrieve the chilled tart crust from the freezer or refrigerator. Pour the slightly cooled chocolate ganache evenly into the prepared crust. Gently smooth the top with an offset spatula or the back of a spoon for a professional finish. If you see any air bubbles on the surface, you can gently tap the tart pan on the counter a couple of times to release them.
- Chill to Set: Carefully transfer the assembled tart to the refrigerator. Chill for at least 4 hours, or preferably overnight, until the ganache filling is completely firm and set. Patience is key here; trying to slice it too early will result in a messy, unset filling. The longer chill also allows the flavours to meld beautifully.
- Unmold and Serve: Once the tart is fully set, carefully remove the outer ring of the tart pan. If needed, gently warm the sides of the pan with your hands for a few seconds to help release it cleanly. You can leave the tart on the metal base for serving or carefully slide a large offset spatula or cake lifter underneath to transfer it to a serving plate (this requires care). Slice with a sharp knife, wiping the blade clean between cuts for neat slices. Serve chilled.
Nutrition Facts
- Servings: 10-12 slices
- Calories per serving (approximate): 350-420 kcal (depending on cookie type, chocolate Cacao %, and exact slice size)
- Fat: High in fat, primarily from the heavy cream and chocolate, including saturated fats. This contributes to the rich texture and mouthfeel, making it a decadent treat best enjoyed in moderation.
- Sugar: Contains significant sugar from both the cookies (especially the filling) and the semi-sweet chocolate. The sweetness level can be adjusted slightly by choosing chocolate with a higher cacao percentage.
- Carbohydrates: Primarily from the cookie crust (flour and sugar in the cookies) and the sugar content in the chocolate.
(Note: These are estimates. Actual nutritional values can vary based on specific brands and ingredients used. This tart is an indulgent dessert.)
Preparation Time
- Active Preparation Time: Approximately 20-25 minutes (Crushing cookies, pressing crust, chopping chocolate, heating cream, mixing ganache, assembling).
- Chilling Time: Minimum 4 hours, preferably 6 hours to overnight. This inactive time is crucial for the ganache to set properly into a sliceable consistency. Rushing the chilling process will compromise the final texture.
How to Serve
This elegant yet simple tart shines on its own, but here are some ways to elevate the presentation and flavour experience:
- Temperature: Serve the tart chilled, straight from the refrigerator. This ensures the ganache is firm and sliceable, providing the best texture.
- Garnishes (Optional – Note: these add extra ingredients):
- Fresh Berries: A handful of fresh raspberries, sliced strawberries, or blueberries adds a beautiful pop of colour and a tart counterpoint to the rich chocolate.
- Whipped Cream: A dollop of lightly sweetened whipped cream (you can use extra heavy cream) beside or on top of each slice adds lightness and visual appeal.
- Chocolate Shavings: Use a vegetable peeler to shave curls from a bar of good quality chocolate (dark, milk, or white) over the top just before serving.
- Cocoa Powder or Powdered Sugar: A light dusting just before serving adds an elegant touch. Use a fine-mesh sieve for an even layer.
- Flaky Sea Salt: A tiny sprinkle of flaky sea salt (like Maldon) enhances the chocolate flavour and adds a sophisticated touch for those who enjoy the sweet-salty combination.
- Chopped Nuts: Toasted chopped hazelnuts, pecans, or walnuts can add a lovely crunch if sprinkled over individual slices.
- Pairings:
- Coffee: A strong espresso or a good cup of black coffee cuts through the richness beautifully.
- Milk: A classic pairing, especially for kids (or kids at heart!).
- Wine: A fruity red wine like a Pinot Noir or a dessert wine like a Ruby Port can complement the chocolate notes.
- Ice Cream: A small scoop of vanilla bean or raspberry ice cream alongside a slice makes it even more indulgent.
- Presentation:
- Use a sharp, thin-bladed knife for slicing. Warm the knife blade slightly in hot water and wipe it clean between each cut for the neatest slices.
- Serve on dessert plates, ensuring any garnishes are added just before serving to maintain freshness and visual appeal.
Additional Tips
- Cookie Crust Variations: While chocolate sandwich cookies are classic, feel free to experiment! Digestive biscuits, Biscoff cookies (for a spiced caramel note), shortbread cookies, or even chocolate graham crackers can work. You may need to adjust the quantity slightly or add 1-2 tablespoons of melted butter if the crumbs seem too dry to hold together (though this technically adds a 4th ingredient).
- Chocolate Choices: Semi-sweet (50-60% cacao) offers a great balance. For a darker, more intense tart, use bittersweet chocolate (60-70% cacao). Milk chocolate can be used, but the result will be much sweeter and softer; it might require slightly less cream or a longer chilling time to set firmly. Avoid using candy melts or generic baking chips not meant for melting, as they may contain stabilizers that affect the ganache texture.
- Perfect Ganache Consistency: The key is patience. Don’t rush the melting process after adding the hot cream. Stir gently from the center outwards until completely smooth. If your ganache does split (looks oily or grainy), gently warm it slightly over a double boiler (or very short bursts in the microwave) while stirring constantly, or try stirring in a tablespoon of cool (not cold) cream or milk. Sometimes an immersion blender on low speed can help emulsify it again, but be careful not to incorporate too much air.
- Make-Ahead Marvel: This tart is ideal for making ahead. Prepare it completely the day before you plan to serve it. Cover it loosely with plastic wrap (try not to let the wrap touch the surface) or place it in an airtight container once fully set and store it in the refrigerator. This allows the flavours to deepen and ensures it’s perfectly chilled.
- Easy Unmolding: Using a tart pan with a removable bottom is crucial. To release the outer ring easily, ensure the tart is thoroughly chilled. If it’s stubborn, briefly wrap a warm (not hot) damp cloth around the outside of the ring for a few seconds, or gently warm it with your hands. Then, place the tart on a can or jar and gently push the outer ring downwards.
- Adding Flavour Twists (Adds Ingredients): While the beauty is in its simplicity, you can infuse the cream before making the ganache. Gently warm the cream with a strip of orange peel, a split vanilla bean, a cinnamon stick, or a few crushed cardamom pods. Let it steep for 15-20 minutes off the heat, then strain the cream and reheat it just to a simmer before pouring over the chocolate. You could also stir in ½ teaspoon of pure vanilla extract or a teaspoon of espresso powder into the finished ganache for extra depth.
- Troubleshooting a Crumbly Crust: If your crust seems too crumbly when pressing it into the pan, it might be because the cookies weren’t crushed finely enough, or the type of cookie used had less inherent binder (less cream filling or fat). Ensure crumbs are powder-fine. If needed, you can incorporate 1-2 tablespoons of melted butter into the crumbs before pressing (acknowledging the ingredient count change), which will help it bind more securely. Press firmly and evenly.
- Achieving a Glossy Top: For an ultra-shiny finish, ensure your chocolate is chopped finely and melts evenly. Stir the ganache gently to avoid incorporating air bubbles, which can dull the surface. Pouring the slightly cooled ganache into the chilled crust also helps maintain a smooth surface as it sets. Avoid covering the tart directly with plastic wrap while chilling, as this can mar the surface; instead, tent it loosely or use a container with a high lid.
FAQ
- Q: Can I make this 3-ingredient chocolate tart gluten-free?
- A: Yes, absolutely! Simply substitute the regular chocolate sandwich cookies with your favourite gluten-free chocolate sandwich cookies. Check the packaging to ensure they are certified gluten-free if required for celiac disease. The heavy cream and pure chocolate are naturally gluten-free (but always double-check labels for cross-contamination warnings if necessary).
- Q: Is it possible to make this tart vegan?
- A: Yes, with substitutions. Use vegan chocolate sandwich cookies (many brands are accidentally vegan, check ingredients). Replace the heavy cream with full-fat canned coconut cream (use only the thick, solidified cream from the top of a chilled can, discarding the watery liquid). Use a good quality dairy-free dark chocolate. The method remains the same, though the setting time for the coconut cream ganache might vary slightly.
- Q: What’s the best type of chocolate to use?
- A: Good quality semi-sweet chocolate (around 50-60% cacao) is generally recommended for a balanced flavour that appeals to most people. Bittersweet (60-70%) works for a deeper, less sweet flavour. Avoid milk chocolate unless you want a very sweet, softer tart. Most importantly, use chocolate designed for melting (bars or high-quality chips/callets/couverture), not generic baking chips which may contain stabilizers affecting texture.
- Q: My ganache looks oily or grainy (split). What went wrong?
- A: Ganache can split if the cream was too hot, if the temperature difference between cream and chocolate was too extreme, or sometimes due to the fat content of the specific chocolate. Over-stirring can also sometimes contribute. Try the rescue tips mentioned in the “Additional Tips” section (gentle warming, adding a little cool cream, gentle blending). Patience during the initial stirring phase is key.
- Q: How long does this chocolate tart last? How should I store it?
- A: Stored properly in the refrigerator, the tart will last for 3-4 days. Keep it covered loosely with plastic wrap or in an airtight container to prevent it from drying out or absorbing fridge odours. The crust may soften slightly over time.
- Q: Can I freeze the 3-ingredient chocolate tart?
- A: Yes, you can freeze this tart. Once fully set, wrap it well in plastic wrap, followed by a layer of aluminum foil or place it in a freezer-safe airtight container. Freeze for up to 1 month. Thaw it overnight in the refrigerator before serving. Note that the texture of the ganache might change slightly after freezing and thawing (it might become slightly less silky), and the crust may be a bit softer.
- Q: What size tart pan should I use? What if I don’t have one with a removable bottom?
- A: A 9-inch round tart pan with a removable bottom is ideal for easy serving. You could use an 8-inch pan for a slightly thicker tart (it might need longer chilling). If you don’t have a tart pan with a removable bottom, you can use a standard 9-inch pie dish. However, you won’t be able to remove the tart whole; you’ll need to slice and serve directly from the dish, which might be slightly messier. Ensure you press the crust well into the pie dish.
- Q: I don’t have a food processor. How can I crush the cookies effectively?
- A: No problem! Place the cookies in a large, heavy-duty zip-top bag. Seal it, removing most of the air. Place the bag on a sturdy counter or cutting board and use a rolling pin, a heavy can, or the flat bottom of a saucepan to bash and roll over the cookies until they are crushed into very fine crumbs. This method takes a bit more effort but works perfectly well. Ensure there are no large chunks left for an even crust texture.

3-Ingredient Chocolate Tart
Ingredients
- 2 cups (about 240g or 8.5 oz) Chocolate Sandwich Cookies (like Oreos): These form the no-bake crust, providing structure, sweetness, and a deep chocolate flavour. Ensure you use the whole cookie, filling and all, for the best flavour and binding.
- 1 ½ cups (360ml or 12 fl oz) Heavy Cream (at least 35% fat): This is the key to a rich, smooth, and stable ganache filling. The high fat content ensures it whips up (if desired for topping, though not required for the filling itself) and sets properly when combined with the chocolate. Do not substitute with lower-fat cream or milk, as the ganache won’t set correctly.
- 12 oz (about 340g) Good Quality Semi-Sweet Chocolate: This is the star of the show. Using good quality chocolate (bars or chips/callets designed for melting) with around 50-60% cacao content provides a balanced, rich flavour that’s not overly sweet or bitter. Finely chopping the chocolate ensures it melts evenly and smoothly when the hot cream is added.
Instructions
- Prepare the Crust: Place the chocolate sandwich cookies (whole, including the filling) into the bowl of a food processor. Pulse several times until the cookies are broken down, then process continuously until they form fine crumbs. If you don’t have a food processor, place the cookies in a sturdy, sealed plastic bag and crush them thoroughly with a rolling pin until they are very fine – consistency is key for the crust holding together.
- Form the Crust: Transfer the fine cookie crumbs into a 9-inch tart pan with a removable bottom. This type of pan is highly recommended as it makes removing the finished tart much easier and cleaner. Press the crumbs firmly and evenly onto the bottom and up the sides of the tart pan. Use the flat bottom of a measuring cup or glass to help create a compact and even layer. Pay special attention to the edges and the corner where the base meets the sides, ensuring it’s well-packed to prevent crumbling later.
- Chill the Crust: Place the tart pan with the pressed crust into the freezer for at least 15-20 minutes (or the refrigerator for 30-40 minutes) while you prepare the filling. Chilling the crust helps it firm up and hold its shape better when the warm ganache filling is added. This step prevents the crust from becoming soggy or mixing with the filling.
- Prepare the Chocolate: While the crust is chilling, finely chop the semi-sweet chocolate. If using chocolate chips, they may not need chopping, but chopping larger bars ensures faster, more even melting. Place the chopped chocolate into a medium-sized heatproof bowl. Set aside. Consistency in chopping size is important for a smooth melt.
- Heat the Cream: Pour the heavy cream into a small saucepan. Heat the cream over medium heat, stirring occasionally to prevent scorching on the bottom. Bring the cream just to a simmer – you’ll see small bubbles forming around the edges of the pan. Do not let it come to a rolling boil, as excessively hot cream can sometimes cause the chocolate to seize or separate.
- Make the Ganache: Carefully pour the hot heavy cream directly over the chopped chocolate in the heatproof bowl. Let it sit undisturbed for 5 minutes. This allows the heat from the cream to gently melt the chocolate without agitation, which helps prevent air bubbles and ensures a smoother ganache.
- Stir the Ganache: After 5 minutes, start stirring the mixture slowly from the center with a whisk or spatula. Gradually widen your stirring motion outwards. Continue to stir gently and patiently until the chocolate is completely melted and the mixture is smooth, glossy, and homogenous. It might look split or uneven at first, but keep stirring gently, and it should come together into a beautiful, silky ganache. Avoid vigorous whisking, which can incorporate air and dull the glossy finish.
- Cool Slightly (Optional but Recommended): Let the ganache cool in the bowl for about 5-10 minutes at room temperature. This slight cooling helps prevent the warm ganache from melting the crust too much upon contact, further ensuring a distinct crust layer.
- Assemble the Tart: Retrieve the chilled tart crust from the freezer or refrigerator. Pour the slightly cooled chocolate ganache evenly into the prepared crust. Gently smooth the top with an offset spatula or the back of a spoon for a professional finish. If you see any air bubbles on the surface, you can gently tap the tart pan on the counter a couple of times to release them.
- Chill to Set: Carefully transfer the assembled tart to the refrigerator. Chill for at least 4 hours, or preferably overnight, until the ganache filling is completely firm and set. Patience is key here; trying to slice it too early will result in a messy, unset filling. The longer chill also allows the flavours to meld beautifully.
- Unmold and Serve: Once the tart is fully set, carefully remove the outer ring of the tart pan. If needed, gently warm the sides of the pan with your hands for a few seconds to help release it cleanly. You can leave the tart on the metal base for serving or carefully slide a large offset spatula or cake lifter underneath to transfer it to a serving plate (this requires care). Slice with a sharp knife, wiping the blade clean between cuts for neat slices. Serve chilled.
Nutrition
- Serving Size: one normal portion
- Calories: 420


