Nestled in the heart of spring, as the first daffodils bravely peek through the soil and the air begins to hum with the promise of warmer days, my family’s dessert cravings take a decidedly chocolatey turn. This year, amidst the usual flurry of Easter baking, I stumbled upon a recipe that has utterly revolutionized our springtime sweet treats: No-Bake Mini Egg Cheesecakes. Let me tell you, these aren’t just good; they’re melt-in-your-mouth, Easter-egg-hunt-worthy fantastic! From the moment the creamy, dreamy cheesecake filling meets the crunchy biscuit base to the explosion of chocolatey goodness from those iconic Mini Eggs, it’s a symphony of textures and flavours. Even my usually dessert-ambivalent teenager declared them “epic,” and my youngest, well, let’s just say there was more chocolate on her face than cheesecake left on her plate. If you’re looking for a show-stopping, yet surprisingly simple, dessert to brighten up your spring celebrations or simply satisfy a sweet tooth, look no further. These No-Bake Mini Egg Cheesecakes are guaranteed to be a crowd-pleaser, and trust me, they’re as much fun to make as they are to devour!
Ingredients
- Digestive Biscuits (250g): These form the crunchy and buttery base of our cheesecake. You can also substitute with Graham crackers or other similar biscuits if digestive biscuits are not available.
- Unsalted Butter (100g, melted): Melted butter binds the crushed biscuits together, creating a sturdy and flavorful crust. Ensure it’s unsalted to control the overall saltiness of the cheesecake.
- Full-Fat Cream Cheese (500g): The star of the show! Full-fat cream cheese is crucial for achieving that rich, creamy, and decadent cheesecake texture. Make sure it’s softened to room temperature for a smooth filling.
- Icing Sugar (100g): Also known as powdered sugar, icing sugar sweetens the cheesecake filling and helps to create a light and airy texture.
- Double Cream (300ml): Double cream (heavy cream) adds richness and volume to the cheesecake filling. It needs to be whipped to soft peaks to incorporate air and lightness.
- Vanilla Extract (1 tsp): A touch of vanilla extract enhances the overall flavour profile of the cheesecake, adding a warm and comforting note.
- Mini Eggs (200g): The iconic Easter treat! Mini Eggs provide a delightful crunch and bursts of milk chocolate flavour throughout the cheesecake and as a topping. Use a mix of whole and roughly crushed Mini Eggs for texture.
Instructions
- Prepare the Biscuit Base: Begin by creating the foundation of your delectable cheesecakes – the biscuit base. Take your 250g of digestive biscuits and place them into a food processor. Pulse the biscuits until they are reduced to fine crumbs. If you don’t have a food processor, you can place the biscuits in a zip-lock bag and crush them using a rolling pin. Ensure you get a consistent crumb texture for an even base.
- Combine Biscuit Crumbs and Butter: Pour the crushed digestive biscuit crumbs into a mixing bowl. Melt 100g of unsalted butter in a microwave or in a saucepan over low heat. Be careful not to overheat the butter; you just want it melted. Pour the melted butter over the biscuit crumbs and mix thoroughly until all the crumbs are evenly moistened and resemble wet sand. This mixture will form the base of your mini cheesecakes, providing a delicious contrast to the creamy filling.
- Press Biscuit Base into Muffin Liners: Line a 12-cup muffin tin with paper or silicone liners. Take approximately two tablespoons of the biscuit crumb mixture and press it firmly into the base of each muffin liner. Use the back of a spoon or your fingers to create a compact and even layer. This step is crucial as it sets the stage for the cheesecake filling and provides a stable base for your mini cheesecakes. Place the muffin tin with the biscuit bases into the refrigerator to chill while you prepare the filling. Chilling helps the base to firm up and prevents it from crumbling when you add the filling.
- Prepare the Cream Cheese Filling: Now, let’s move on to the heart of the recipe – the creamy cheesecake filling. In a large mixing bowl, add 500g of softened full-fat cream cheese. It’s vital that the cream cheese is at room temperature to avoid lumps and ensure a smooth, creamy filling. Beat the cream cheese using an electric whisk or a stand mixer until it is light and fluffy. This might take a couple of minutes. Once the cream cheese is smooth, gradually sift in 100g of icing sugar. Sifting prevents lumps and ensures the icing sugar incorporates smoothly into the cream cheese. Continue to beat until the icing sugar is fully incorporated and the mixture is smooth and creamy.
- Whip the Double Cream: In a separate clean bowl, pour in 300ml of double cream. Using clean beaters or a whisk attachment, whip the double cream until it forms soft peaks. Be careful not to overwhip, as this can result in grainy cream. Soft peaks are achieved when you lift the beaters, and the cream forms peaks that gently curl over at the tips. Whipped double cream adds lightness and volume to the cheesecake filling, making it incredibly smooth and airy.
- Combine Cream Cheese Mixture and Whipped Cream: Gently fold the whipped double cream into the cream cheese and icing sugar mixture. Fold using a spatula in a figure-of-eight motion, being careful not to deflate the whipped cream. This technique ensures the filling remains light and airy. Continue folding until the whipped cream is fully incorporated and the mixture is homogenous.
- Add Vanilla Extract and Crushed Mini Eggs: Pour 1 teaspoon of vanilla extract into the cheesecake filling and gently stir to combine. Roughly crush approximately 100g of Mini Eggs. You can do this by placing them in a zip-lock bag and gently tapping them with a rolling pin or the base of a mug. Add the crushed Mini Eggs to the cheesecake filling and gently fold them in, distributing them evenly throughout the mixture. Reserve the remaining whole Mini Eggs for decoration.
- Fill the Muffin Liners: Remove the muffin tin from the refrigerator. Spoon the cheesecake filling evenly into each muffin liner, on top of the biscuit bases. Fill each liner almost to the top, leaving a little space for decoration. Smooth the tops of the cheesecakes with the back of a spoon or a spatula to create an even surface.
- Chill for at Least 4 Hours (Preferably Overnight): This is a crucial step for no-bake cheesecakes. Cover the muffin tin with cling film or place it in an airtight container. Refrigerate for at least 4 hours, or preferably overnight. Chilling allows the cheesecake filling to set completely, resulting in a firm and sliceable texture. The longer they chill, the better the texture will be.
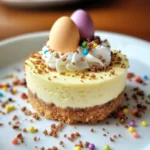
- Decorate with Mini Eggs and Serve: Once the cheesecakes are fully set, carefully remove them from the muffin tin. Peel away the paper or silicone liners. Decorate each mini cheesecake with whole Mini Eggs. Arrange them attractively on top of each cheesecake. Your No-Bake Mini Egg Cheesecakes are now ready to serve and enjoy! Store any leftover cheesecakes in an airtight container in the refrigerator for up to 3 days.
Nutrition Facts
(Per Serving – 1 Mini Cheesecake, approximate values)
- Servings: 12
- Calories: 350 kcal
- Fat: 25g
Please note: Nutritional values are estimates and can vary based on specific brands and ingredient variations.
Preparation Time
- Prep Time: 30 minutes (Active hands-on time for preparing the base and filling)
- Chilling Time: Minimum 4 hours (Ideally overnight for best results)
- Total Time: 4 hours 30 minutes (Minimum, including chilling)
This No-Bake Mini Egg Cheesecake recipe is wonderfully convenient as it requires no baking at all. The majority of the time is spent chilling in the refrigerator, making it perfect for preparing ahead of time, especially for busy occasions or celebrations.
How to Serve
These delightful No-Bake Mini Egg Cheesecakes are incredibly versatile and can be served in various ways to enhance the experience:
- Chilled: The classic and most refreshing way to enjoy them is straight from the refrigerator. The cold temperature enhances the creamy texture and makes them a perfect treat, especially on warmer spring days.
- With Extra Toppings:
- Whipped Cream: A dollop of freshly whipped cream on top adds an extra layer of indulgence and creaminess.
- Chocolate Sauce: Drizzle with warm or cold chocolate sauce for an intensified chocolatey flavour. Consider using a milk chocolate, dark chocolate, or even a white chocolate sauce.
- Caramel Sauce: A swirl of caramel sauce complements the chocolate and creamy cheesecake beautifully, adding a touch of sweetness and richness.
- Fresh Berries: Serve with a side of fresh berries like strawberries, raspberries, or blueberries. The tartness of the berries cuts through the richness of the cheesecake and adds a vibrant touch of colour and flavour.
- Sprinkles: For a fun and festive touch, especially for children’s parties or Easter celebrations, add colourful sprinkles alongside the Mini Eggs.
- Grated Chocolate: Grate some dark or milk chocolate over the top for an elegant finish and an extra layer of chocolate intensity.
- As Part of a Dessert Platter: Include these mini cheesecakes as part of a larger dessert platter featuring other spring treats like fruit tarts, macarons, and chocolate-covered strawberries. This offers variety and visual appeal.
- For Special Occasions:
- Easter Dessert: They are perfect for Easter celebrations, themed perfectly with the Mini Eggs and their spring colours.
- Spring Gatherings: Ideal for picnics, garden parties, and spring birthdays. Their individual portion size makes them easy to serve and enjoy outdoors.
- Afternoon Tea: Add them to your afternoon tea spread for a delightful sweet treat alongside scones and finger sandwiches.
- With Coffee or Tea: Serve alongside a cup of freshly brewed coffee or a pot of tea. The richness of the cheesecake pairs wonderfully with the slight bitterness of coffee or the warmth of tea.
- Individual Presentation: Serve them on small dessert plates or cake stands for an elegant presentation. You can also use decorative cupcake liners for extra visual appeal.
Additional Tips for Perfect No-Bake Mini Egg Cheesecakes
- Use Full-Fat Cream Cheese: For the creamiest and most flavourful cheesecake, always opt for full-fat cream cheese. Low-fat or fat-free versions will not provide the same rich texture and may result in a less stable cheesecake.
- Soften Cream Cheese Properly: Ensure your cream cheese is fully softened to room temperature before you start mixing. This is crucial for achieving a smooth, lump-free filling. If the cream cheese is too cold, it will be difficult to beat smoothly and may leave small lumps in your cheesecake.
- Don’t Overmix the Filling: Once you’ve combined the whipped cream with the cream cheese mixture, be gentle and avoid overmixing. Overmixing can deflate the whipped cream and result in a denser cheesecake. Fold just until everything is combined.
- Chill for the Right Duration: Patience is key with no-bake cheesecakes. Allow ample chilling time, at least 4 hours, but preferably overnight. This ensures the cheesecake sets properly and achieves the desired firm texture. Rushing the chilling process may result in a soft and unset cheesecake.
- Experiment with Biscuit Base Flavours: While digestive biscuits are classic, feel free to experiment with other biscuit bases. Gingernuts, Oreos (cream removed), or even shortbread cookies can create interesting flavour variations. Adjust the butter quantity slightly depending on the dryness of the biscuit you choose.
- Vary the Chocolate: Mini Eggs are iconic for this recipe, but you can also use other chocolate candies or chopped chocolate bars. Consider using Cadbury Creme Eggs (chopped), chopped Easter chocolate bunnies, or even different types of chocolate like white chocolate or dark chocolate chunks for a different flavour profile.
- Make Ahead of Time: No-bake cheesecakes are excellent make-ahead desserts. They can be prepared up to 2-3 days in advance and stored in the refrigerator. This makes them perfect for parties and gatherings as you can get the dessert sorted well in advance.
- Freezing for Longer Storage (with considerations): While best enjoyed fresh, you can freeze these mini cheesecakes for longer storage. Freeze them individually on a baking sheet until solid, then wrap them tightly in cling film and place them in a freezer-safe container. However, be aware that freezing can slightly alter the texture of the cheesecake, making it slightly less creamy upon thawing. Thaw them in the refrigerator overnight before serving. Decorate with fresh Mini Eggs after thawing as the original ones might lose their crunch in the freezer.
FAQ Section
Q1: Can I make these cheesecakes ahead of time?
A: Absolutely! In fact, No-Bake Mini Egg Cheesecakes are perfect for making ahead. They need to chill for at least 4 hours to set properly, and they can be made up to 2-3 days in advance. Store them covered in the refrigerator until you are ready to serve. This makes them an excellent choice for parties or busy schedules.
Q2: Can I use low-fat cream cheese?
A: While you can technically use low-fat cream cheese, it’s highly recommended to use full-fat cream cheese for the best results. Full-fat cream cheese provides the rich, creamy texture and flavour that is characteristic of a good cheesecake. Low-fat versions may result in a less creamy and potentially less stable cheesecake.
Q3: Can I freeze these mini cheesecakes?
A: Yes, you can freeze No-Bake Mini Egg Cheesecakes. Freeze them individually on a baking sheet until solid, then wrap them tightly in cling film and place them in a freezer-safe container. They can be frozen for up to 1-2 months. Thaw them in the refrigerator overnight before serving. Be aware that the texture might change slightly after freezing and thawing, becoming slightly less creamy. Decorate with fresh Mini Eggs after thawing.
Q4: I don’t have digestive biscuits. What can I substitute?
A: If you don’t have digestive biscuits, you can substitute them with Graham crackers, graham cracker crumbs, shortbread cookies, or other similar plain biscuits. The key is to use a biscuit that is relatively plain in flavour so it complements the cheesecake filling without overpowering it. Adjust the butter quantity slightly depending on the dryness of the biscuit you choose.
Q5: My cheesecake filling is lumpy. What did I do wrong?
A: Lumpy cheesecake filling is often caused by using cold cream cheese. Ensure your cream cheese is fully softened to room temperature before you start mixing. This is crucial for a smooth filling. If you still have lumps, try beating the cream cheese on its own for longer before adding the icing sugar. Sifting the icing sugar can also help prevent lumps.
Q6: Can I make one large cheesecake instead of mini cheesecakes?
A: Yes, you can adapt this recipe to make one larger cheesecake. Use a springform pan (around 8-9 inches). Press the biscuit base into the bottom of the pan and follow the same instructions for the filling. Chilling time may need to be slightly extended for a larger cheesecake to ensure it sets completely.
Q7: Can I add other flavours to the cheesecake filling?
A: Absolutely! This recipe is a great base for flavour variations. You can add a tablespoon of lemon juice or zest for a citrusy twist, a teaspoon of almond extract for a nutty flavour, or even a shot of coffee liqueur for a coffee cheesecake. Get creative and experiment with your favourite flavour combinations!
Q8: The Mini Eggs are sinking to the bottom of my cheesecakes. How can I prevent this?
A: To prevent Mini Eggs from sinking, you can add the crushed Mini Eggs in two stages. Fold in half of the crushed Mini Eggs into the filling before spooning it into the muffin liners. Then, gently press the remaining crushed and whole Mini Eggs onto the tops of the cheesecakes just before chilling. Also, ensure the cheesecake filling is thick enough. If it’s too runny, the Mini Eggs will be more likely to sink. Chilling the filling slightly in the fridge for 15-20 minutes before filling the liners can also help.
No-Bake Mini Egg Cheesecake
Ingredients
- Digestive Biscuits (250g): These form the crunchy and buttery base of our cheesecake. You can also substitute with Graham crackers or other similar biscuits if digestive biscuits are not available.
- Unsalted Butter (100g, melted): Melted butter binds the crushed biscuits together, creating a sturdy and flavorful crust. Ensure it’s unsalted to control the overall saltiness of the cheesecake.
- Full-Fat Cream Cheese (500g): The star of the show! Full-fat cream cheese is crucial for achieving that rich, creamy, and decadent cheesecake texture. Make sure it’s softened to room temperature for a smooth filling.
- Icing Sugar (100g): Also known as powdered sugar, icing sugar sweetens the cheesecake filling and helps to create a light and airy texture.
- Double Cream (300ml): Double cream (heavy cream) adds richness and volume to the cheesecake filling. It needs to be whipped to soft peaks to incorporate air and lightness.
- Vanilla Extract (1 tsp): A touch of vanilla extract enhances the overall flavour profile of the cheesecake, adding a warm and comforting note.
- Mini Eggs (200g): The iconic Easter treat! Mini Eggs provide a delightful crunch and bursts of milk chocolate flavour throughout the cheesecake and as a topping. Use a mix of whole and roughly crushed Mini Eggs for texture.
Instructions
- Prepare the Biscuit Base: Begin by creating the foundation of your delectable cheesecakes – the biscuit base. Take your 250g of digestive biscuits and place them into a food processor. Pulse the biscuits until they are reduced to fine crumbs. If you don’t have a food processor, you can place the biscuits in a zip-lock bag and crush them using a rolling pin. Ensure you get a consistent crumb texture for an even base.
- Combine Biscuit Crumbs and Butter: Pour the crushed digestive biscuit crumbs into a mixing bowl. Melt 100g of unsalted butter in a microwave or in a saucepan over low heat. Be careful not to overheat the butter; you just want it melted. Pour the melted butter over the biscuit crumbs and mix thoroughly until all the crumbs are evenly moistened and resemble wet sand. This mixture will form the base of your mini cheesecakes, providing a delicious contrast to the creamy filling.
- Press Biscuit Base into Muffin Liners: Line a 12-cup muffin tin with paper or silicone liners. Take approximately two tablespoons of the biscuit crumb mixture and press it firmly into the base of each muffin liner. Use the back of a spoon or your fingers to create a compact and even layer. This step is crucial as it sets the stage for the cheesecake filling and provides a stable base for your mini cheesecakes. Place the muffin tin with the biscuit bases into the refrigerator to chill while you prepare the filling. Chilling helps the base to firm up and prevents it from crumbling when you add the filling.
- Prepare the Cream Cheese Filling: Now, let’s move on to the heart of the recipe – the creamy cheesecake filling. In a large mixing bowl, add 500g of softened full-fat cream cheese. It’s vital that the cream cheese is at room temperature to avoid lumps and ensure a smooth, creamy filling. Beat the cream cheese using an electric whisk or a stand mixer until it is light and fluffy. This might take a couple of minutes. Once the cream cheese is smooth, gradually sift in 100g of icing sugar. Sifting prevents lumps and ensures the icing sugar incorporates smoothly into the cream cheese. Continue to beat until the icing sugar is fully incorporated and the mixture is smooth and creamy.
- Whip the Double Cream: In a separate clean bowl, pour in 300ml of double cream. Using clean beaters or a whisk attachment, whip the double cream until it forms soft peaks. Be careful not to overwhip, as this can result in grainy cream. Soft peaks are achieved when you lift the beaters, and the cream forms peaks that gently curl over at the tips. Whipped double cream adds lightness and volume to the cheesecake filling, making it incredibly smooth and airy.
- Combine Cream Cheese Mixture and Whipped Cream: Gently fold the whipped double cream into the cream cheese and icing sugar mixture. Fold using a spatula in a figure-of-eight motion, being careful not to deflate the whipped cream. This technique ensures the filling remains light and airy. Continue folding until the whipped cream is fully incorporated and the mixture is homogenous.
- Add Vanilla Extract and Crushed Mini Eggs: Pour 1 teaspoon of vanilla extract into the cheesecake filling and gently stir to combine. Roughly crush approximately 100g of Mini Eggs. You can do this by placing them in a zip-lock bag and gently tapping them with a rolling pin or the base of a mug. Add the crushed Mini Eggs to the cheesecake filling and gently fold them in, distributing them evenly throughout the mixture. Reserve the remaining whole Mini Eggs for decoration.
- Fill the Muffin Liners: Remove the muffin tin from the refrigerator. Spoon the cheesecake filling evenly into each muffin liner, on top of the biscuit bases. Fill each liner almost to the top, leaving a little space for decoration. Smooth the tops of the cheesecakes with the back of a spoon or a spatula to create an even surface.
- Chill for at Least 4 Hours (Preferably Overnight): This is a crucial step for no-bake cheesecakes. Cover the muffin tin with cling film or place it in an airtight container. Refrigerate for at least 4 hours, or preferably overnight. Chilling allows the cheesecake filling to set completely, resulting in a firm and sliceable texture. The longer they chill, the better the texture will be.
- Decorate with Mini Eggs and Serve: Once the cheesecakes are fully set, carefully remove them from the muffin tin. Peel away the paper or silicone liners. Decorate each mini cheesecake with whole Mini Eggs. Arrange them attractively on top of each cheesecake. Your No-Bake Mini Egg Cheesecakes are now ready to serve and enjoy! Store any leftover cheesecakes in an airtight container in the refrigerator for up to 3 days.
Nutrition
- Serving Size: one normal portion
- Calories: 350
- Fat: 25g