

My family has a sweet tooth that could rival a candy factory, and finding treats that satisfy everyone from the picky toddler to the dessert-connoisseur grandpa can sometimes feel like a Herculean task. That’s where these Mini Caramel Balls came into our lives, like a tiny, golden, sugary miracle. From the moment I stumbled upon this recipe, intrigued by its simplicity and the promise of pure caramel bliss, I knew I had to try it. Let me tell you, the aroma that filled my kitchen as the caramel cooked was intoxicating, a warm, buttery sweetness that had everyone peeking in to see what magic was brewing. And the taste? Oh, the taste! These little balls are pockets of pure caramel heaven – chewy, intensely flavored, and utterly irresistible. They were gone within minutes of being cool enough to eat, devoured with happy sighs and sticky fingers. Even my notoriously sugar-averse husband couldn’t resist sneaking a few (okay, maybe more than a few!). This isn’t just a recipe; it’s a guaranteed crowd-pleaser, perfect for parties, holidays, or just a simple weekend treat. Prepare to fall in love with the easiest, most delectable caramel experience you’ve ever had – in mini form!
Ingredients for Mini Caramel Ball Perfection
Here’s what you’ll need to create these irresistible Mini Caramel Balls. Each ingredient plays a vital role in achieving that perfect chewy texture and rich caramel flavor.
- Butter (Unsalted): Forms the base of the caramel, adding richness, flavor, and that melt-in-your-mouth texture. Unsalted butter allows you to control the saltiness of the caramel.
- Granulated Sugar: The star of the show, sugar caramelizes to create the signature sweet and complex flavor of caramel.
- Light Corn Syrup: Prevents sugar crystallization, resulting in a smooth and chewy caramel texture. It also adds a subtle sweetness and gloss.
- Sweetened Condensed Milk: Adds creaminess, sweetness, and a wonderful chewiness to the caramel. It also helps bind the ingredients together.
- Vanilla Extract: Enhances the overall flavor profile, adding a warm and aromatic note that complements the caramel beautifully. Use pure vanilla extract for the best flavor.
- Salt (Sea Salt or Kosher): Balances the sweetness of the caramel and enhances the other flavors. A touch of salt is crucial for a well-rounded caramel.
Crafting Your Mini Caramel Balls: Step-by-Step Instructions
Follow these simple instructions to create perfect Mini Caramel Balls every time. Don’t be intimidated by caramel making – this recipe is designed to be easy and foolproof!
- Prepare Your Workspace and Ingredients: Before you begin, gather all your ingredients and measuring tools. Lightly grease a baking sheet or line it with parchment paper or a silicone mat. This will prevent the caramel balls from sticking later. Having everything prepped and ready will make the process smooth and efficient.
- Melt the Butter: In a medium-sized, heavy-bottomed saucepan, melt the unsalted butter over medium-low heat. Using a heavy-bottomed saucepan is important as it distributes heat evenly and prevents scorching. Melt the butter gently, stirring occasionally, until it is completely melted and just starting to bubble slightly.
- Add Sugar and Corn Syrup: Once the butter is melted, add the granulated sugar and light corn syrup to the saucepan. Stir continuously with a wooden spoon or heat-resistant spatula until the sugar is fully dissolved and the mixture is well combined. Make sure there are no visible sugar granules left.
- Bring to a Gentle Boil: Increase the heat to medium and bring the mixture to a gentle boil. It’s important to stir constantly during this stage to prevent the sugar from sticking to the bottom of the pan and burning. Continue stirring until the mixture starts to bubble steadily.
- Stir in Sweetened Condensed Milk: Once the mixture is boiling gently, reduce the heat to low and slowly pour in the sweetened condensed milk. Stir constantly and vigorously as you add the condensed milk to ensure it is fully incorporated and the mixture remains smooth. Be careful as the mixture might sputter slightly when you add the condensed milk.
- Continue Cooking and Stirring: Continue to cook the caramel mixture over low heat, stirring constantly, for approximately 8-10 minutes. The caramel will gradually thicken and darken in color. It’s crucial to stir continuously during this stage to prevent burning and ensure even cooking. The caramel is ready when it reaches a deep golden brown color and thickens to a point where it coats the back of a spoon and holds its shape briefly when you run your finger through it. Alternatively, you can use a candy thermometer and cook until it reaches the soft ball stage (around 235-240°F or 112-115°C).
- Remove from Heat and Add Vanilla and Salt: Once the caramel has reached the desired consistency and color, remove the saucepan from the heat immediately. Stir in the vanilla extract and salt. Stir until they are fully incorporated into the caramel, ensuring even distribution of flavor. The vanilla extract will enhance the overall aroma and taste, while the salt will balance the sweetness.
- Cool Slightly and Shape into Balls: Allow the caramel mixture to cool slightly for a few minutes until it is cool enough to handle but still pliable. Working quickly, use a teaspoon or a small cookie scoop to scoop out portions of the caramel and roll them into small balls using your hands. If the caramel is too sticky, you can lightly grease your hands with a little butter or cooking spray. Aim for consistent ball sizes for even cooling and presentation.
- Place on Prepared Baking Sheet: Place the formed caramel balls onto the prepared baking sheet, spacing them slightly apart to prevent them from sticking together as they cool and set.
- Chill to Set: Place the baking sheet with the caramel balls in the refrigerator to chill and set completely. This will take approximately 30-60 minutes, or until the caramel balls are firm enough to handle easily. Chilling helps them firm up and makes them easier to eat and store.
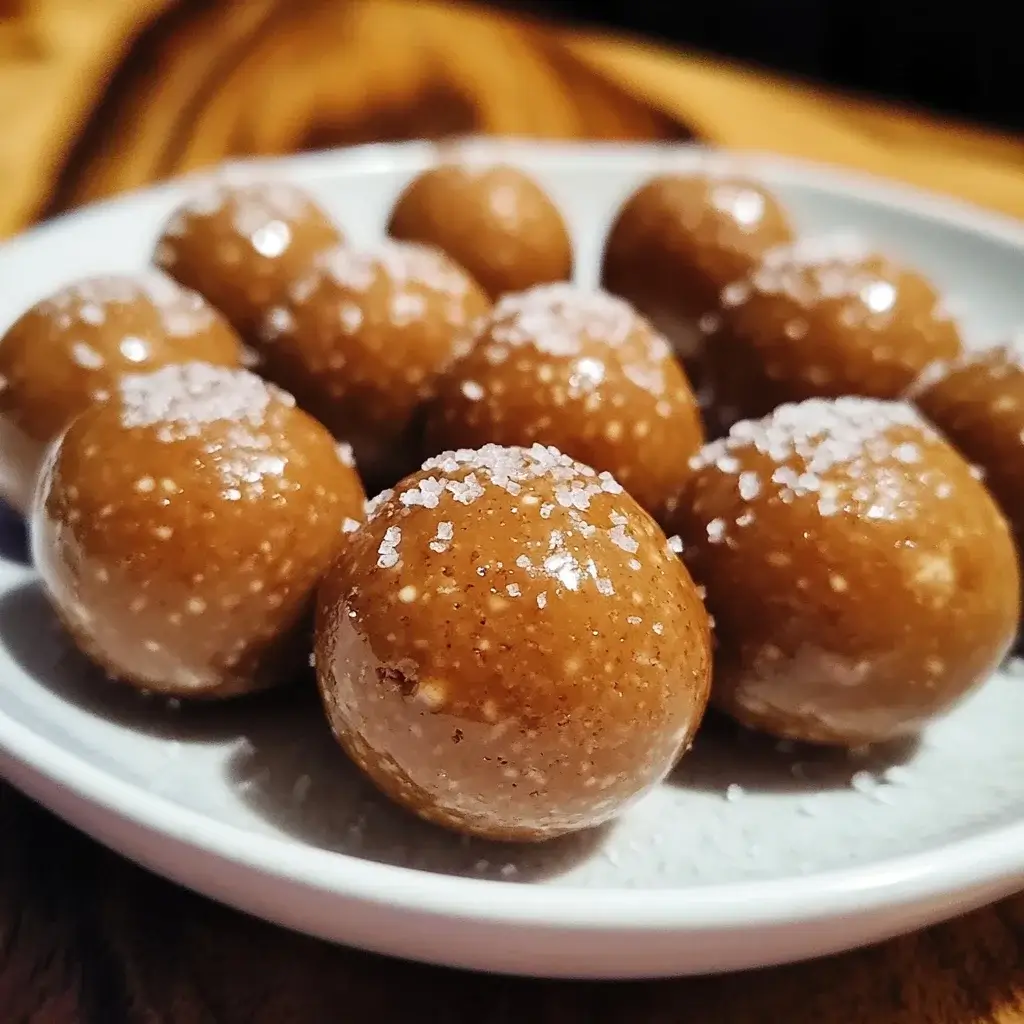
- Optional: Decorate or Coat (See Tips Below): Once the caramel balls are set, you can enjoy them as they are, or you can get creative and decorate or coat them. Consider dipping them in melted chocolate, rolling them in chopped nuts, sprinkles, or sea salt flakes for added flavor and visual appeal.
- Store Properly: Store the Mini Caramel Balls in an airtight container at room temperature for up to 3-4 days, or in the refrigerator for up to a week. If storing at room temperature, keep them in a cool, dry place away from direct sunlight or heat. Refrigerating will help them maintain their shape and texture, especially in warmer climates.
Nutrition Facts: Sweet Treats in Moderation
While incredibly delicious, Mini Caramel Balls are a treat to be enjoyed in moderation. Here’s a general estimate of the nutritional information per serving (approximately 2-3 balls, depending on size). Please note that these are estimates and can vary based on specific ingredient brands and portion sizes.
- Servings: Approximately 20-25 Mini Caramel Balls (recipe yield)
- Serving Size: 2-3 balls
- Calories per Serving: Approximately 150-200 calories
- Fat: 8-10 grams
Disclaimer: Nutritional information is an estimate and should be used as a general guideline. For precise nutritional information, use a nutrition calculator with the specific brands and measurements of ingredients used.
Preparation Time: Quick Treat, Lasting Joy
These Mini Caramel Balls are surprisingly quick to prepare, especially considering the incredible flavor they deliver. Here’s a breakdown of the estimated time involved:
- Prep Time: 15 minutes (gathering ingredients, greasing baking sheet, measuring)
- Cook Time: 10-15 minutes (caramel cooking on the stovetop)
- Cooling & Setting Time: 30-60 minutes (refrigeration time)
- Total Time: Approximately 1-1.5 hours (including cooling and setting)
Short Description: From start to finish, you can have a batch of delicious Mini Caramel Balls ready to devour in about an hour to an hour and a half, with most of that time being hands-off chilling in the refrigerator. The active cooking time is minimal, making this a perfect treat for when you want something special without spending hours in the kitchen.
How to Serve Mini Caramel Balls: Delightful Presentation Ideas
Mini Caramel Balls are versatile and can be served in numerous ways, making them perfect for various occasions. Here are some serving suggestions to elevate your caramel ball experience:
- Simple and Classic: Arrange the chilled Mini Caramel Balls on a pretty platter or serving dish. Their golden color and bite-sized appeal make them visually appealing on their own.
- Dessert Board Star: Include Mini Caramel Balls as part of a larger dessert board featuring other treats like cookies, brownies, fruits, and cheeses. They add a delightful chewy texture and caramel flavor contrast.
- Party Favors: Package a few Mini Caramel Balls in small cellophane bags tied with ribbons as adorable and delicious party favors for birthdays, holidays, or gatherings.
- Ice Cream Topping: Crumble or chop Mini Caramel Balls and sprinkle them over ice cream or frozen yogurt for an extra layer of caramel sweetness and chewy texture.
- Coffee or Tea Accompaniment: Serve a small bowl of Mini Caramel Balls alongside coffee, tea, or hot chocolate for a sweet and comforting treat.
- Gift Giving: Package Mini Caramel Balls in decorative tins or jars to create thoughtful and homemade gifts for friends, family, or neighbors during the holidays or special occasions.
- Layered Desserts: Incorporate Mini Caramel Balls into layered desserts like parfaits, trifles, or dessert jars. They add a chewy caramel layer that complements creams, fruits, and cakes beautifully.
- Chocolate Dipped Extravaganza: Dip chilled Mini Caramel Balls in melted dark, milk, or white chocolate and let them set for an extra decadent and visually appealing treat.
Additional Tips for Mini Caramel Ball Success
Mastering Mini Caramel Balls is easy with these helpful tips and tricks. From ingredient variations to storage secrets, these insights will ensure your caramel balls are always perfect.
- Use a Heavy-Bottomed Saucepan: A heavy-bottomed saucepan is crucial for even heat distribution and prevents the caramel from scorching or burning. This ensures a smooth and consistently cooked caramel base.
- Stir Constantly During Cooking: Continuous stirring is essential, especially during the boiling and thickening stages. This prevents the sugar from sticking to the bottom of the pan and burning, resulting in a smooth and even caramel.
- Don’t Overcook the Caramel: Overcooking caramel can make it hard and brittle. Cook until it reaches a deep golden brown color and coats the back of a spoon. Use a candy thermometer to ensure accuracy (soft ball stage – 235-240°F or 112-115°C).
- Work Quickly When Shaping: Once the caramel is slightly cooled, work quickly to shape the balls as it will start to firm up as it cools. If it becomes too firm to roll easily, you can gently warm it for a few seconds over very low heat to soften it slightly.
- Grease Your Hands if Needed: If the caramel is too sticky to handle, lightly grease your hands with a tiny amount of butter or cooking spray. This will prevent the caramel from sticking to your hands and make shaping easier.
- Customize with Flavor Extracts: Experiment with different flavor extracts to customize your Mini Caramel Balls. Try almond extract, maple extract, or even a hint of coffee extract for unique flavor profiles. Add the extract after removing the caramel from the heat.
- Add Mix-Ins for Texture and Flavor: Incorporate mix-ins like chopped nuts (pecans, walnuts, peanuts), dried cranberries, pretzels, or toffee bits into the caramel mixture after removing it from the heat. Stir them in gently before shaping the balls for added texture and flavor complexity.
- Chocolate Coating Variations: For chocolate-covered Mini Caramel Balls, try different types of chocolate like dark chocolate for a bittersweet contrast, milk chocolate for classic sweetness, or white chocolate for a creamy and delicate flavor. You can also add a sprinkle of sea salt flakes on top of the chocolate coating before it sets for a salted caramel chocolate treat.
Frequently Asked Questions (FAQ) About Mini Caramel Balls
Curious about making Mini Caramel Balls? Here are answers to some common questions to help you succeed in creating this delightful treat.
Q1: Can I use a different type of sugar instead of granulated sugar?
A1: Granulated sugar works best for this recipe as it caramelizes beautifully. While you could potentially use brown sugar, it will result in a caramel with a molasses-like flavor, which will alter the classic caramel taste. We recommend sticking with granulated sugar for the most authentic caramel flavor.
Q2: Can I make these caramel balls ahead of time?
A2: Absolutely! Mini Caramel Balls are perfect for making ahead of time. They can be stored in an airtight container at room temperature for 3-4 days or in the refrigerator for up to a week. This makes them ideal for party planning or preparing treats in advance.
Q3: My caramel is too sticky to roll into balls. What can I do?
A3: If your caramel is too sticky, it might not have been cooked quite long enough or it might be too warm. Let it cool slightly longer in the saucepan until it thickens a bit more and becomes easier to handle. You can also lightly grease your hands with butter or cooking spray to help prevent sticking. If it’s still very sticky, chilling the caramel mixture in the refrigerator for a short time (10-15 minutes) before shaping can also help.
Q4: Can I freeze Mini Caramel Balls?
A4: While you can freeze Mini Caramel Balls, their texture might slightly change upon thawing. Caramel can sometimes become a bit softer after freezing. If you do freeze them, wrap them individually in plastic wrap and then place them in an airtight container. Thaw them in the refrigerator before serving. They are best enjoyed fresh or stored at room temperature or in the refrigerator for optimal texture.
Q5: What if I don’t have light corn syrup? Can I substitute it?
A5: Light corn syrup helps prevent sugar crystallization and contributes to a smooth, chewy caramel texture. While you can technically make caramel without it, the texture might be slightly grainier. If you must substitute, you could try using golden syrup or honey, but be aware that these will slightly alter the flavor of the caramel. Light corn syrup is generally recommended for the best results in this recipe.
Q6: How do I know when the caramel is cooked enough without a candy thermometer?
A6: If you don’t have a candy thermometer, you can use the “cold water test.” While the caramel is cooking, drop a tiny spoonful of caramel into a glass of cold water. If it forms a soft ball that you can easily flatten with your fingers (soft ball stage), it’s ready. Another visual cue is the color and thickness. The caramel should be a deep golden brown and thick enough to coat the back of a spoon and hold its shape briefly when you run your finger through it.
Q7: Can I double or triple this recipe?
A7: Yes, you can easily double or triple this recipe to make a larger batch of Mini Caramel Balls. Ensure you use a larger saucepan if you are increasing the batch size to prevent overcrowding and ensure even cooking. The cooking time might need to be slightly adjusted for larger batches, so keep a close eye on the caramel and use the visual cues or candy thermometer to determine doneness.
Q8: Are Mini Caramel Balls gluten-free?
A8: Yes, as long as you use gluten-free vanilla extract, Mini Caramel Balls are naturally gluten-free. The ingredients – butter, sugar, corn syrup, sweetened condensed milk, vanilla extract, and salt – are all inherently gluten-free. However, always double-check the labels of your ingredients to ensure they are certified gluten-free if you have strict dietary restrictions or are making them for someone with celiac disease.
Print
Mini Caramel Balls Recipe
Ingredients
Here’s what you’ll need to create these irresistible Mini Caramel Balls. Each ingredient plays a vital role in achieving that perfect chewy texture and rich caramel flavor.
- Butter (Unsalted): Forms the base of the caramel, adding richness, flavor, and that melt-in-your-mouth texture. Unsalted butter allows you to control the saltiness of the caramel.
- Granulated Sugar: The star of the show, sugar caramelizes to create the signature sweet and complex flavor of caramel.
- Light Corn Syrup: Prevents sugar crystallization, resulting in a smooth and chewy caramel texture. It also adds a subtle sweetness and gloss.
- Sweetened Condensed Milk: Adds creaminess, sweetness, and a wonderful chewiness to the caramel. It also helps bind the ingredients together.
- Vanilla Extract: Enhances the overall flavor profile, adding a warm and aromatic note that complements the caramel beautifully. Use pure vanilla extract for the best flavor.
- Salt (Sea Salt or Kosher): Balances the sweetness of the caramel and enhances the other flavors. A touch of salt is crucial for a well-rounded caramel.
Instructions
Follow these simple instructions to create perfect Mini Caramel Balls every time. Don’t be intimidated by caramel making – this recipe is designed to be easy and foolproof!
- Prepare Your Workspace and Ingredients: Before you begin, gather all your ingredients and measuring tools. Lightly grease a baking sheet or line it with parchment paper or a silicone mat. This will prevent the caramel balls from sticking later. Having everything prepped and ready will make the process smooth and efficient.
- Melt the Butter: In a medium-sized, heavy-bottomed saucepan, melt the unsalted butter over medium-low heat. Using a heavy-bottomed saucepan is important as it distributes heat evenly and prevents scorching. Melt the butter gently, stirring occasionally, until it is completely melted and just starting to bubble slightly.
- Add Sugar and Corn Syrup: Once the butter is melted, add the granulated sugar and light corn syrup to the saucepan. Stir continuously with a wooden spoon or heat-resistant spatula until the sugar is fully dissolved and the mixture is well combined. Make sure there are no visible sugar granules left.
- Bring to a Gentle Boil: Increase the heat to medium and bring the mixture to a gentle boil. It’s important to stir constantly during this stage to prevent the sugar from sticking to the bottom of the pan and burning. Continue stirring until the mixture starts to bubble steadily.
- Stir in Sweetened Condensed Milk: Once the mixture is boiling gently, reduce the heat to low and slowly pour in the sweetened condensed milk. Stir constantly and vigorously as you add the condensed milk to ensure it is fully incorporated and the mixture remains smooth. Be careful as the mixture might sputter slightly when you add the condensed milk.
- Continue Cooking and Stirring: Continue to cook the caramel mixture over low heat, stirring constantly, for approximately 8-10 minutes. The caramel will gradually thicken and darken in color. It’s crucial to stir continuously during this stage to prevent burning and ensure even cooking. The caramel is ready when it reaches a deep golden brown color and thickens to a point where it coats the back of a spoon and holds its shape briefly when you run your finger through it. Alternatively, you can use a candy thermometer and cook until it reaches the soft ball stage (around 235-240°F or 112-115°C).
- Remove from Heat and Add Vanilla and Salt: Once the caramel has reached the desired consistency and color, remove the saucepan from the heat immediately. Stir in the vanilla extract and salt. Stir until they are fully incorporated into the caramel, ensuring even distribution of flavor. The vanilla extract will enhance the overall aroma and taste, while the salt will balance the sweetness.
- Cool Slightly and Shape into Balls: Allow the caramel mixture to cool slightly for a few minutes until it is cool enough to handle but still pliable. Working quickly, use a teaspoon or a small cookie scoop to scoop out portions of the caramel and roll them into small balls using your hands. If the caramel is too sticky, you can lightly grease your hands with a little butter or cooking spray. Aim for consistent ball sizes for even cooling and presentation.
- Place on Prepared Baking Sheet: Place the formed caramel balls onto the prepared baking sheet, spacing them slightly apart to prevent them from sticking together as they cool and set.
- Chill to Set: Place the baking sheet with the caramel balls in the refrigerator to chill and set completely. This will take approximately 30-60 minutes, or until the caramel balls are firm enough to handle easily. Chilling helps them firm up and makes them easier to eat and store.
- Optional: Decorate or Coat (See Tips Below): Once the caramel balls are set, you can enjoy them as they are, or you can get creative and decorate or coat them. Consider dipping them in melted chocolate, rolling them in chopped nuts, sprinkles, or sea salt flakes for added flavor and visual appeal.
- Store Properly: Store the Mini Caramel Balls in an airtight container at room temperature for up to 3-4 days, or in the refrigerator for up to a week. If storing at room temperature, keep them in a cool, dry place away from direct sunlight or heat. Refrigerating will help them maintain their shape and texture, especially in warmer climates.
Nutrition
- Serving Size: one normal portion
- Calories: 200
- Fat: 10 grams


