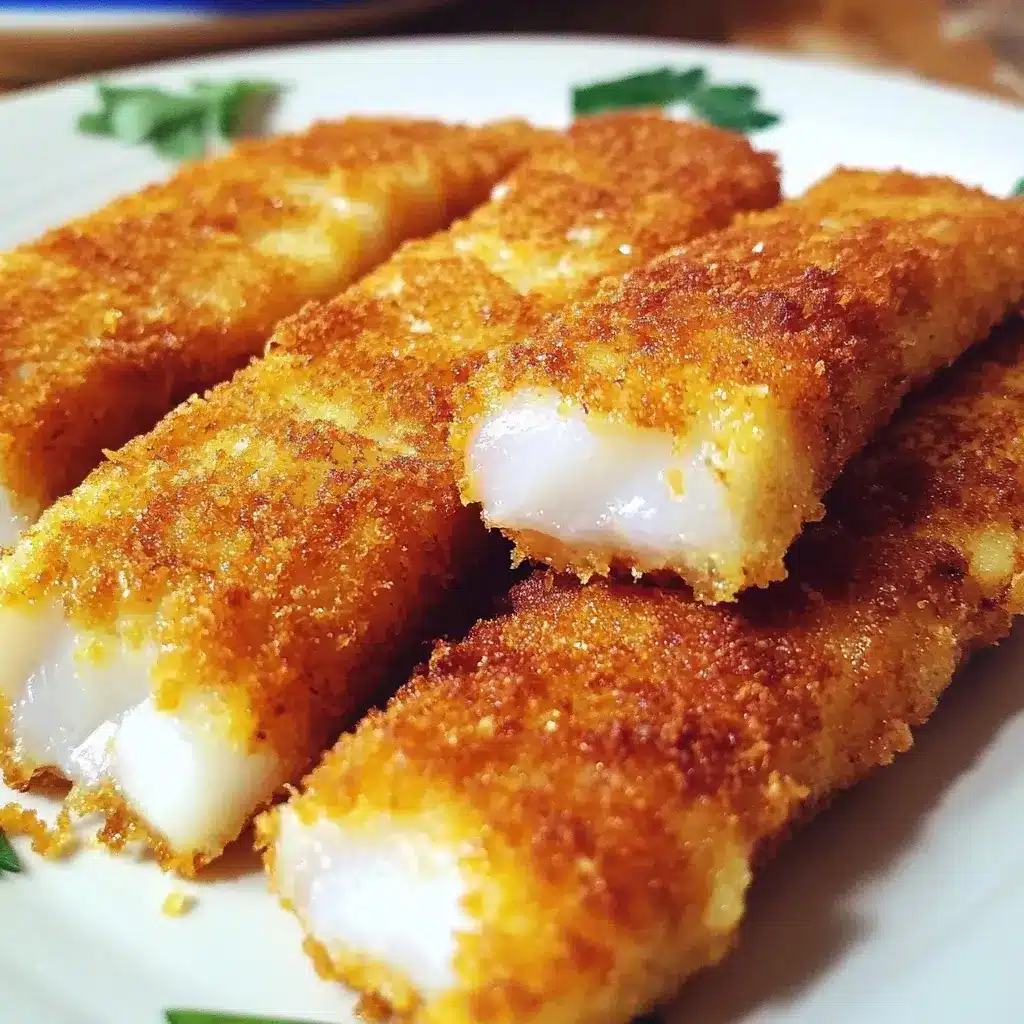
Finding truly healthy, kid-approved meals that don’t take hours to prepare can feel like searching for a unicorn sometimes. I remember the era of frozen fish sticks in our house – convenient, yes, but often greasy and filled with ingredients I couldn’t pronounce. I wanted something better, something wholesome, but I knew ditching the familiar fish stick shape might cause a dinner table revolt. That’s when I embarked on the mission to create the perfect Healthy Baked Fish Sticks. Honestly, I was skeptical at first. Could baked really compete with the deep-fried crispiness my family associated with fish sticks? The first batch was… okay. Edible, but not exciting. But after a few tweaks – experimenting with coatings, perfecting the baking time and temperature, and choosing the right fish – magic happened. These baked fish sticks emerged golden brown, incredibly crispy on the outside, and flaky, tender, and moist on the inside. The reaction? Success! My kids devoured them, asking for seconds (and thirds!). My husband, initially wary, declared them “better than the frozen kind,” and I felt immense satisfaction knowing we were enjoying a delicious meal packed with goodness, not grease. They’ve become a staple in our meal rotation, perfect for busy weeknights, and proof that healthy eating can be incredibly satisfying and crowd-pleasing. This recipe isn’t just about food; it’s about creating happy, healthy mealtime memories.
Ingredients
Here’s what you’ll need to create these delicious and healthy baked fish sticks:
- 1.5 lbs (about 680g) Firm White Fish Fillets: Choose options like cod, halibut, tilapia, or haddock. Ensure they are boneless and skinless for easy preparation. The firmness helps them hold their shape during baking.
- 1/2 cup (about 60g) All-Purpose Flour: This creates the initial layer for the egg wash and breadcrumbs to adhere to. You can substitute with whole wheat flour for extra fiber or a gluten-free blend if needed.
- 2 Large Eggs: Beaten lightly, the eggs act as the binder, helping the crispy coating stick securely to the fish.
- 1 tbsp Water (or Milk): Added to the beaten eggs, this thins the mixture slightly, allowing for a more even coating without being too thick.
- 1.5 cups (about 90g) Panko Breadcrumbs: These Japanese-style breadcrumbs are lighter and airier than traditional breadcrumbs, resulting in an exceptionally crispy texture when baked.
- 1/4 cup (about 25g) Grated Parmesan Cheese (Optional but Recommended): Adds a delicious salty, umami depth of flavor to the coating and aids in browning. Use finely grated for best results.
- 1 tsp Paprika: Provides a lovely golden color and a subtle, slightly sweet peppery flavor. Smoked paprika can be used for a smokier taste.
- 1 tsp Garlic Powder: Adds a savory, aromatic flavor that complements the fish beautifully.
- 1/2 tsp Onion Powder: Contributes another layer of savory depth to the breadcrumb mixture.
- 1/2 tsp Dried Parsley (or 1 tbsp Fresh, Finely Chopped): Adds specks of color and a mild, fresh herby note.
- Salt (to taste): Essential for enhancing all the flavors. Start with about 1/2 tsp in the flour and 1/2 tsp in the breadcrumbs, adjusting as needed.
- Black Pepper (to taste): Freshly ground black pepper adds a touch of warmth and spice. Add about 1/4 tsp to the flour and 1/4 tsp to the breadcrumbs.
- 3 tbsp Olive Oil (or Avocado Oil): Drizzled over the fish sticks before baking, this helps them achieve a golden-brown color and contributes to the crispiness, while using a heart-healthy fat. Melted butter can be used for a richer flavor, but olive or avocado oil keeps it lighter.
- Lemon Wedges (for serving): A classic accompaniment, the acidity cuts through the richness and brightens the flavor of the fish.
- Fresh Parsley (chopped, for garnish – optional): Adds a touch of freshness and visual appeal upon serving.
Instructions
Follow these steps carefully for perfectly crispy and delicious baked fish sticks:
- Preheat and Prepare: Preheat your oven to 425°F (220°C). Line a large baking sheet with parchment paper for easy cleanup and to prevent sticking. Alternatively, you can use a wire rack placed over a baking sheet – this allows air to circulate all around the fish sticks, maximizing crispiness. If using a wire rack, lightly grease it with cooking spray or oil.
- Prepare the Fish: Rinse the fish fillets under cold water and pat them thoroughly dry with paper towels. This step is crucial – excess moisture will prevent the coating from sticking properly and can lead to soggy fish sticks. Cut the fish fillets into stick shapes, roughly 1 inch wide and 3-4 inches long. Try to keep them relatively uniform in size for even cooking.
- Set Up Breading Station: Prepare three shallow dishes or plates for your breading station.
- Dish 1 (Flour): Combine the all-purpose flour, about 1/2 tsp salt, and 1/4 tsp black pepper. Whisk together.
- Dish 2 (Egg Wash): In the second dish, whisk the eggs and water (or milk) together until well combined.
- Dish 3 (Panko Mixture): In the third dish, combine the Panko breadcrumbs, grated Parmesan cheese (if using), paprika, garlic powder, onion powder, dried parsley, and the remaining 1/2 tsp salt and 1/4 tsp black pepper (adjust salt and pepper to your preference). Mix thoroughly to ensure the seasonings are evenly distributed.
- Coat the Fish: Work with one fish stick at a time.
- First, dredge the fish stick lightly in the seasoned flour mixture, shaking off any excess. Ensure it’s coated on all sides. The flour helps the egg wash adhere better.
- Next, dip the flour-coated fish stick into the egg wash, letting any excess drip back into the dish. Make sure the entire stick is moistened.
- Finally, press the egg-coated fish stick firmly into the Panko breadcrumb mixture, turning to coat all sides evenly. Gently press the breadcrumbs onto the fish to help them stick.
- Arrange on Baking Sheet: Place the coated fish stick onto the prepared parchment-lined baking sheet or greased wire rack. Repeat the coating process with the remaining fish sticks, arranging them in a single layer. Ensure there is some space between each fish stick; overcrowding the pan will cause them to steam rather than crisp up. You might need two baking sheets if necessary.
- Drizzle with Oil: Once all fish sticks are coated and arranged, drizzle the olive oil (or avocado oil/melted butter) evenly over the tops. This helps them turn golden brown and crispy during baking. Alternatively, you can use an oil mister or cooking spray for a lighter, more even coating.
- Bake: Place the baking sheet(s) in the preheated oven. Bake for 15-20 minutes, or until the fish sticks are golden brown, crispy, and the fish is cooked through and flakes easily with a fork. The exact time will depend on the thickness of your fish sticks and your specific oven. For maximum crispiness, you can carefully flip the fish sticks halfway through the baking time using tongs or a spatula, although it’s often not strictly necessary if using a wire rack or if they are browning well.
- Check for Doneness: To check if the fish is cooked, insert a fork into the thickest part of a fish stick and gently twist. The fish should be opaque and flake easily. If using a meat thermometer, the internal temperature should reach 145°F (63°C).
- Serve: Remove the baking sheet from the oven. Let the fish sticks rest for a minute or two before serving. Serve immediately while hot and crispy, garnished with fresh parsley (if desired) and with lemon wedges on the side for squeezing.
Nutrition Facts
This nutritional information is an estimate and can vary based on the specific type of fish used and exact ingredient quantities.
- Servings: This recipe typically yields 4 servings.
- Calories per Serving: Approximately 350-450 calories per serving (depending on fish type and oil usage). This is significantly lower than deep-fried counterparts.
- Protein: High in lean protein (approx. 30-40g per serving), essential for muscle building, repair, and overall satiety. Fish is an excellent source of high-quality protein.
- Omega-3 Fatty Acids: Provides beneficial Omega-3 fatty acids (amount varies by fish type, with fattier fish like cod offering more), which are crucial for heart health, brain function, and reducing inflammation.
- Lower in Fat: Significantly lower in total fat and especially saturated fat compared to traditional deep-fried fish sticks, making it a heart-healthier choice. The use of baking and olive oil minimizes unhealthy fats.
- Source of Vitamins & Minerals: Contains essential nutrients like Vitamin D (especially in certain fish), B vitamins (B12, Niacin), Selenium, and Iodine, contributing to overall well-being.
Preparation Time
- Total Time: Approximately 35-45 minutes
- Prep Time: 20 minutes (Includes cutting the fish and setting up the breading station)
- Cook Time: 15-20 minutes (Baking time in the oven)
This recipe is relatively quick to prepare, making it an excellent option for weeknight dinners when time is limited but you still want a wholesome, home-cooked meal.
How to Serve
These healthy baked fish sticks are versatile! Here are some delicious ways to serve them:
- Classic Dipping Sauces:
- Homemade Tartar Sauce: A classic pairing! Mix mayonnaise or Greek yogurt with finely chopped pickles or relish, capers, fresh dill, lemon juice, and a pinch of salt and pepper.
- Ketchup: Always a kid-friendly favorite. Opt for low-sugar varieties if possible.
- Honey Mustard: A sweet and tangy option that complements the savory fish.
- Ranch Dip: Use a light ranch dressing or make your own with Greek yogurt.
- Spicy Mayo/Sriracha Aioli: Mix mayonnaise with sriracha or your favorite hot sauce for a kick.
- Garlic Aioli: Combine mayonnaise with minced garlic, lemon juice, and Dijon mustard.
- Yogurt-Dill Sauce: A lighter, fresher alternative to tartar sauce made with plain Greek yogurt, fresh dill, lemon juice, garlic powder, salt, and pepper.
- Healthy Side Dishes:
- Baked Fries or Wedges: Serve alongside classic baked potato fries, sweet potato fries, or seasoned potato wedges for that “fish and chips” feel, but healthier.
- Roasted Vegetables: Toss broccoli florets, carrot sticks, bell pepper strips, zucchini, or asparagus with olive oil, salt, and pepper, and roast alongside the fish sticks (adjust timing as needed) or separately.
- Steamed Greens: Simple steamed green beans, peas, or broccoli provide a vibrant, nutritious side.
- Coleslaw: A creamy or vinegar-based coleslaw adds a refreshing crunch. Make your own for a healthier dressing using Greek yogurt or a light vinaigrette.
- Fresh Salad: A simple green salad with a light vinaigrette dressing balances the meal.
- Quinoa or Rice: Serve with a side of fluffy quinoa, brown rice, or cauliflower rice for a complete meal.
- Mushy Peas: A British classic often served with fish and chips – easily made healthier at home.
- Creative Serving Ideas:
- Fish Stick Tacos: Serve in warm tortillas with shredded cabbage or slaw, avocado, salsa, and a drizzle of lime crema.
- Fish Stick Sandwiches or Wraps: Place hot fish sticks in buns or wraps with lettuce, tomato, and your favorite sauce.
- On top of a Salad: Add crispy fish sticks to a large salad for a protein boost.
- “Fish Finger” Butty: A simple British comfort food – serve between slices of buttered bread with ketchup or tartar sauce.
- Presentation:
- Serve hot, directly from the oven for maximum crispiness.
- Garnish with fresh chopped parsley or dill.
- Always include lemon wedges for squeezing over the fish.
- For kids, serve in fun baskets or alongside creatively cut vegetables.
Additional Tips
Maximize your healthy baked fish stick success with these extra tips:
- Achieve Ultimate Crispiness: The key is dry fish, Panko breadcrumbs, and high heat. Don’t skip patting the fish dry. Consider using a wire rack over your baking sheet to allow air circulation underneath. Don’t overcrowd the pan! If they still aren’t as crisp as you like, you can broil them for the last 1-2 minutes, watching very carefully to prevent burning.
- Choose the Right Fish: While cod, tilapia, and haddock are great choices, feel free to experiment! Halibut works well but is pricier. Catfish can also be used. Avoid very delicate fish like sole, which might fall apart, or overly oily fish like salmon, which have a strong flavor that might overpower the classic fish stick profile (though baked salmon nuggets are delicious in their own right!). Ensure the fish is fresh or properly thawed if frozen.
- Uniform Size Matters: Cutting the fish into similarly sized sticks ensures they all cook evenly. If you have some very thin pieces and some thick ones, the thin ones might overcook and dry out before the thick ones are done. Aim for about 1 inch thick.
- Season Every Layer: Don’t just season the breadcrumbs. Adding salt and pepper to the flour mixture ensures the flavor penetrates beyond just the coating. Taste your Panko mixture before coating to ensure it’s seasoned to your liking.
- Get Creative with Seasoning: Feel free to customize the Panko mixture! Add Old Bay seasoning for a coastal flavor, a pinch of cayenne pepper for heat, dried dill for a fresh taste, or even nutritional yeast for a cheesy flavor without dairy (if omitting Parmesan). Lemon zest added to the Panko mix is also delicious.
- Make-Ahead & Freezing: You can bread the fish sticks ahead of time. Place the breaded, uncooked sticks on a parchment-lined baking sheet in a single layer and freeze until solid (about 1-2 hours). Then, transfer them to a freezer-safe bag or container. They can be baked directly from frozen, adding about 5-10 minutes to the baking time. This is fantastic for meal prep!
- Reheating Leftovers: Baked fish sticks are best eaten fresh, as they lose crispiness upon reheating. However, the best way to reheat leftovers is in the oven or an air fryer at around 375°F (190°C) for 5-10 minutes, until heated through and re-crisped. Avoid the microwave, which will make them soggy.
- Gluten-Free Option: Easily make this recipe gluten-free! Substitute the all-purpose flour with a gluten-free all-purpose blend (like one containing rice flour, tapioca starch, and potato starch). Use certified gluten-free Panko breadcrumbs (readily available in most supermarkets) or crush gluten-free cornflakes or rice Chex cereal for a crispy coating. Ensure all other seasonings (like garlic/onion powder) are certified gluten-free if needed for celiac disease.
FAQ Section
Here are answers to some frequently asked questions about healthy baked fish sticks:
- Q: Are baked fish sticks actually healthy?
- A: Yes, compared to their deep-fried counterparts, these homemade baked fish sticks are significantly healthier. Baking uses much less oil, drastically reducing the overall fat and calorie content, especially unhealthy saturated and trans fats often found in commercially fried foods. Using lean white fish provides high-quality protein and essential nutrients like Omega-3s. Making them at home also gives you complete control over the ingredients, avoiding preservatives, excessive sodium, and fillers found in many frozen varieties.
- Q: How do I prevent my baked fish sticks from getting soggy?
- A: Soggy fish sticks are usually caused by excess moisture or insufficient heat/air circulation. Ensure you pat the fish completely dry before breading. Use Panko breadcrumbs, as they absorb less oil and crisp up better than regular breadcrumbs. Bake at a high temperature (425°F/220°C). Don’t overcrowd the baking sheet – leave space between sticks. Using a wire rack set over the baking sheet is the best method for ensuring air circulates all around, crisping the bottom as well as the top. Finally, serve them immediately after baking.
- Q: What is the best type of fish to use for homemade fish sticks?
- A: Firm, flaky white fish are ideal because they hold their shape well and have a mild flavor that kids often prefer. Excellent choices include Cod, Haddock, Tilapia, Halibut, Pollock, and even Catfish. Cod and Haddock offer a classic, slightly firmer texture, while Tilapia is very mild and cooks quickly. Choose based on availability, price, and personal preference.
- Q: Can I make these fish sticks in an air fryer?
- A: Absolutely! An air fryer works wonderfully for making fish sticks extra crispy. Prepare the fish sticks as directed. Preheat your air fryer to 400°F (200°C). Place the fish sticks in the air fryer basket in a single layer (you’ll likely need to cook in batches). Lightly spray the tops with oil. Air fry for 10-12 minutes, flipping halfway through, until golden brown, crispy, and cooked through.
- Q: Can I prepare these ahead of time?
- A: Yes, you have a couple of options. You can bread the fish sticks, place them on a baking sheet, cover tightly, and refrigerate for a few hours before baking (though they might not be quite as crisp as freshly breaded ones). The best make-ahead method is freezing: bread the fish sticks, freeze them solid on a baking sheet, then transfer to a freezer bag. Bake directly from frozen, adding 5-10 minutes to the cooking time.
- Q: How do I make gluten-free baked fish sticks?
- A: It’s simple! Replace the all-purpose flour with a good quality gluten-free all-purpose flour blend. Swap the regular Panko breadcrumbs for gluten-free Panko breadcrumbs. Alternatively, you can crush gluten-free cornflakes or rice cereal for a different kind of crispy coating. Ensure your Parmesan cheese (if using) and seasonings are certified gluten-free if catering to someone with celiac disease.
- Q: Are these fish sticks kid-friendly?
- A: Highly kid-friendly! The familiar shape, crispy texture, and mild flavor make them appealing to most children, even picky eaters. They are a fantastic way to get kids to eat fish. Serving them with favorite dipping sauces like ketchup or ranch further increases their appeal. Because they are homemade, you control the seasoning and sodium levels.
- Q: How do homemade baked fish sticks compare to store-bought frozen ones?
- A: Homemade baked fish sticks generally taste much fresher and have a better texture (crispier coating, flakier fish) than most frozen varieties. Nutritionally, they are far superior as they contain significantly less sodium, unhealthy fats, and no artificial preservatives or fillers. While frozen fish sticks offer convenience, the relatively short prep time for this homemade version makes them a worthwhile and much healthier alternative. You also get the satisfaction of knowing exactly what’s in your food.
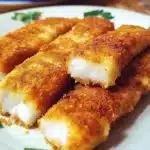
Healthy Baked Fish Sticks
Ingredients
Here’s what you’ll need to create these delicious and healthy baked fish sticks:
- 1.5 lbs (about 680g) Firm White Fish Fillets: Choose options like cod, halibut, tilapia, or haddock. Ensure they are boneless and skinless for easy preparation. The firmness helps them hold their shape during baking.
- 1/2 cup (about 60g) All-Purpose Flour: This creates the initial layer for the egg wash and breadcrumbs to adhere to. You can substitute with whole wheat flour for extra fiber or a gluten-free blend if needed.
- 2 Large Eggs: Beaten lightly, the eggs act as the binder, helping the crispy coating stick securely to the fish.
- 1 tbsp Water (or Milk): Added to the beaten eggs, this thins the mixture slightly, allowing for a more even coating without being too thick.
- 1.5 cups (about 90g) Panko Breadcrumbs: These Japanese-style breadcrumbs are lighter and airier than traditional breadcrumbs, resulting in an exceptionally crispy texture when baked.
- 1/4 cup (about 25g) Grated Parmesan Cheese (Optional but Recommended): Adds a delicious salty, umami depth of flavor to the coating and aids in browning. Use finely grated for best results.
- 1 tsp Paprika: Provides a lovely golden color and a subtle, slightly sweet peppery flavor. Smoked paprika can be used for a smokier taste.
- 1 tsp Garlic Powder: Adds a savory, aromatic flavor that complements the fish beautifully.
- 1/2 tsp Onion Powder: Contributes another layer of savory depth to the breadcrumb mixture.
- 1/2 tsp Dried Parsley (or 1 tbsp Fresh, Finely Chopped): Adds specks of color and a mild, fresh herby note.
- Salt (to taste): Essential for enhancing all the flavors. Start with about 1/2 tsp in the flour and 1/2 tsp in the breadcrumbs, adjusting as needed.
- Black Pepper (to taste): Freshly ground black pepper adds a touch of warmth and spice. Add about 1/4 tsp to the flour and 1/4 tsp to the breadcrumbs.
- 3 tbsp Olive Oil (or Avocado Oil): Drizzled over the fish sticks before baking, this helps them achieve a golden-brown color and contributes to the crispiness, while using a heart-healthy fat. Melted butter can be used for a richer flavor, but olive or avocado oil keeps it lighter.
- Lemon Wedges (for serving): A classic accompaniment, the acidity cuts through the richness and brightens the flavor of the fish.
- Fresh Parsley (chopped, for garnish – optional): Adds a touch of freshness and visual appeal upon serving.
Instructions
Follow these steps carefully for perfectly crispy and delicious baked fish sticks:
- Preheat and Prepare: Preheat your oven to 425°F (220°C). Line a large baking sheet with parchment paper for easy cleanup and to prevent sticking. Alternatively, you can use a wire rack placed over a baking sheet – this allows air to circulate all around the fish sticks, maximizing crispiness. If using a wire rack, lightly grease it with cooking spray or oil.
- Prepare the Fish: Rinse the fish fillets under cold water and pat them thoroughly dry with paper towels. This step is crucial – excess moisture will prevent the coating from sticking properly and can lead to soggy fish sticks. Cut the fish fillets into stick shapes, roughly 1 inch wide and 3-4 inches long. Try to keep them relatively uniform in size for even cooking.
- Set Up Breading Station: Prepare three shallow dishes or plates for your breading station.
- Dish 1 (Flour): Combine the all-purpose flour, about 1/2 tsp salt, and 1/4 tsp black pepper. Whisk together.
- Dish 2 (Egg Wash): In the second dish, whisk the eggs and water (or milk) together until well combined.
- Dish 3 (Panko Mixture): In the third dish, combine the Panko breadcrumbs, grated Parmesan cheese (if using), paprika, garlic powder, onion powder, dried parsley, and the remaining 1/2 tsp salt and 1/4 tsp black pepper (adjust salt and pepper to your preference). Mix thoroughly to ensure the seasonings are evenly distributed.
- Coat the Fish: Work with one fish stick at a time.
- First, dredge the fish stick lightly in the seasoned flour mixture, shaking off any excess. Ensure it’s coated on all sides. The flour helps the egg wash adhere better.
- Next, dip the flour-coated fish stick into the egg wash, letting any excess drip back into the dish. Make sure the entire stick is moistened.
- Finally, press the egg-coated fish stick firmly into the Panko breadcrumb mixture, turning to coat all sides evenly. Gently press the breadcrumbs onto the fish to help them stick.
- Arrange on Baking Sheet: Place the coated fish stick onto the prepared parchment-lined baking sheet or greased wire rack. Repeat the coating process with the remaining fish sticks, arranging them in a single layer. Ensure there is some space between each fish stick; overcrowding the pan will cause them to steam rather than crisp up. You might need two baking sheets if necessary.
- Drizzle with Oil: Once all fish sticks are coated and arranged, drizzle the olive oil (or avocado oil/melted butter) evenly over the tops. This helps them turn golden brown and crispy during baking. Alternatively, you can use an oil mister or cooking spray for a lighter, more even coating.
- Bake: Place the baking sheet(s) in the preheated oven. Bake for 15-20 minutes, or until the fish sticks are golden brown, crispy, and the fish is cooked through and flakes easily with a fork. The exact time will depend on the thickness of your fish sticks and your specific oven. For maximum crispiness, you can carefully flip the fish sticks halfway through the baking time using tongs or a spatula, although it’s often not strictly necessary if using a wire rack or if they are browning well.
- Check for Doneness: To check if the fish is cooked, insert a fork into the thickest part of a fish stick and gently twist. The fish should be opaque and flake easily. If using a meat thermometer, the internal temperature should reach 145°F (63°C).
- Serve: Remove the baking sheet from the oven. Let the fish sticks rest for a minute or two before serving. Serve immediately while hot and crispy, garnished with fresh parsley (if desired) and with lemon wedges on the side for squeezing.
Nutrition
- Serving Size: one normal portion
- Calories: 450
- Protein: 40g


