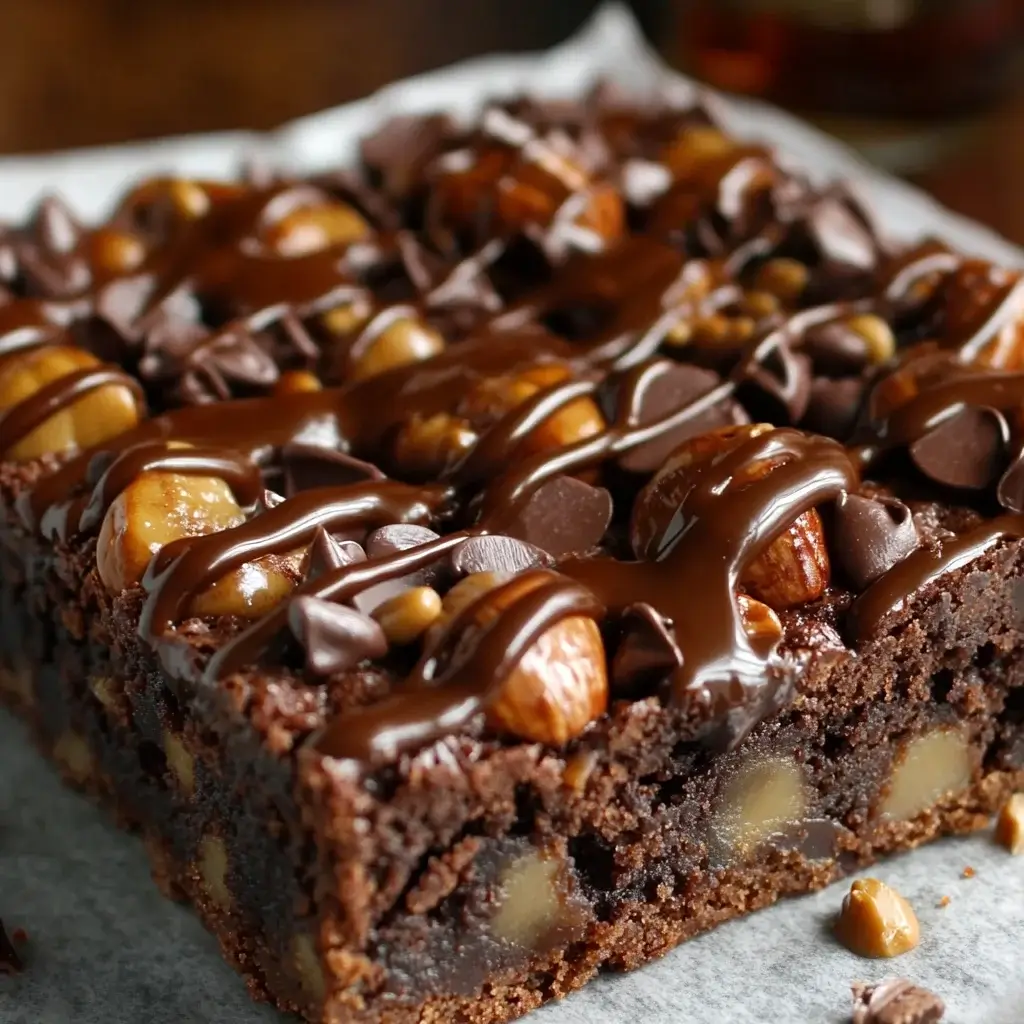

The first time I made these Easy Turtle Brownies, it was for a last-minute neighborhood potluck. Panic baking is a real thing in my household, and I needed something guaranteed to impress without requiring hours of complex steps or ingredients I didn’t already have lurking in my pantry. I remembered seeing a recipe that combined three of my ultimate weaknesses: rich chocolate brownies, gooey caramel, and crunchy pecans. The name “Turtle Brownies” immediately evoked those classic candies, promising a decadent experience. Skeptical that something labeled “easy” could deliver such a knockout flavor combination, I decided to give it a shot. Let me tell you, the results were nothing short of spectacular. The aroma wafting from the oven – that intoxicating blend of deep chocolate, toasted nuts, and caramelizing sugar – had my family circling the kitchen like sharks. When they finally cooled enough to slice (a test of patience in itself!), the reaction was unanimous: pure, unadulterated bliss. The brownies were fudgy and intensely chocolatey, the caramel layer was perfectly gooey without being messy, and the toasted pecans added a delightful crunch and nutty counterpoint. They weren’t just good; they were phenomenal. They disappeared from the potluck table in record time, with several neighbors asking for the recipe. Since then, these Easy Turtle Brownies have become my go-to dessert for everything from casual family dinners to holiday celebrations. They strike that perfect balance between effortless preparation and gourmet taste, proving that you don’t need to be a pastry chef to create something truly memorable. They are consistently chewy, rich, and satisfying, hitting all the right notes for a perfect sweet treat. The simplicity of using a boxed brownie mix as a base (though you can absolutely use your favorite from-scratch recipe!) makes them accessible even for novice bakers, while the layering technique creates a result that looks and tastes incredibly sophisticated. They are, quite simply, a guaranteed crowd-pleaser.
Ingredients
Here’s what you’ll need to create these decadent treats:
- 1 box (approx. 18-19 oz) Fudge Brownie Mix: The foundation of our easy recipe. Choose your favorite brand – one that promises a rich, fudgy texture works best. Plus, you’ll need the ingredients listed on the box (typically water, vegetable oil, and eggs).
- 1 cup (about 4-5 oz) Pecan Halves: Roughly chopped. These provide the essential nutty crunch characteristic of turtle candies. Toasting them beforehand enhances their flavor (see tips!).
- 1 package (11-14 oz) Soft Caramel Candies: The individually wrapped squares work perfectly. You’ll be unwrapping and melting these down for the gooey center. Alternatively, about 1 ½ cups of thick caramel sauce or dulce de leche can be used.
- 1/4 cup Heavy Cream (or Evaporated Milk): This is crucial for melting the caramel candies smoothly into a luscious, pourable sauce. It prevents the caramel from becoming too hard after baking.
- 1/2 cup Semi-Sweet Chocolate Chips: An optional but highly recommended addition! Sprinkling these over the caramel or mixing them into the top layer of brownie batter adds extra pockets of chocolatey goodness.
- Ingredients called for on the Brownie Mix Box: Typically includes Water, Vegetable Oil, and Eggs. Ensure you have these on hand as per your chosen brownie mix instructions.
Instructions
Follow these simple steps for perfectly layered Turtle Brownies:
- Preheat and Prepare: Preheat your oven to 350°F (175°C) or the temperature specified on your brownie mix box. Grease and flour a 9×13 inch baking pan. For easier removal and cleanup, line the pan with parchment paper, leaving an overhang on two sides to use as handles later. Lightly grease the parchment paper as well.
- Toast the Pecans (Optional but Recommended): Spread the chopped pecans on a dry baking sheet. Toast in the preheated oven for 5-7 minutes, or until fragrant and slightly darkened. Watch carefully to prevent burning. Set aside to cool. Toasting deepens their nutty flavor significantly.
- Prepare the Brownie Batter: In a large bowl, prepare the brownie batter according to the package directions, using the specified amounts of water, oil, and eggs. Mix until just combined – be careful not to overmix, as this can lead to tough brownies. Overmixing develops the gluten too much. Aim for a thick, uniform batter with no dry streaks remaining.
- Layer Half the Batter: Spread half of the prepared brownie batter evenly into the bottom of your prepared baking pan. Use an offset spatula or the back of a spoon to ensure it covers the entire base in a relatively even layer. This forms the bottom chocolate foundation.
- Prepare the Caramel Layer: Unwrap the soft caramel candies (this is often the most time-consuming part!). Place the unwrapped caramels and the heavy cream (or evaporated milk) in a medium microwave-safe bowl. Microwave on high in 30-second intervals, stirring well after each interval, until the caramels are completely melted and the mixture is smooth. This usually takes 1.5 to 2.5 minutes total. Alternatively, melt the caramels and cream in a small saucepan over low heat, stirring constantly until smooth. Do not overheat, or the caramel can become tough.
- Add the Caramel and Pecans: Carefully pour the melted caramel mixture evenly over the brownie batter layer in the pan. Gently spread it with a spatula if needed, but be careful not to disturb the batter underneath too much. Immediately sprinkle the toasted, chopped pecans evenly over the caramel layer. If using, sprinkle the ½ cup of semi-sweet chocolate chips over the pecans as well.
- Add the Remaining Batter: Dollop the remaining half of the brownie batter over the caramel-pecan layer. Use a spoon to place spoonfuls evenly across the surface. It’s okay if the caramel layer isn’t completely covered; some peeking through looks appealing. Gently spread the dollops with an offset spatula or knife to cover most of the caramel/pecan layer, swirling slightly if desired, but avoid mixing the layers together extensively. You want distinct layers.
- Bake: Place the pan in the preheated oven. Bake for 30-40 minutes, or until a wooden toothpick inserted into the brownie portion (avoiding the caramel pockets) near the center comes out with moist crumbs attached, but not wet batter. The exact time will depend on your oven and the specific brownie mix used. The edges should look set and slightly pulled away from the sides of the pan. Be careful not to overbake, as this will dry out the brownies and harden the caramel.
- Cool Completely: This step is crucial! Remove the pan from the oven and place it on a wire rack. Let the brownies cool completely in the pan, which can take at least 2-3 hours, or even longer. Cooling allows the caramel to set properly, preventing a gooey mess when slicing, and lets the flavors meld beautifully. Rushing this step will result in messy, less-defined squares. For best results, you can even chill them slightly in the refrigerator for 30 minutes before cutting, especially if your kitchen is warm.
- Slice and Serve: Once completely cooled, use the parchment paper overhangs to lift the entire brownie slab out of the pan onto a cutting board. Use a large, sharp knife to cut into squares. Wiping the knife clean with a damp paper towel between cuts will help ensure neat, clean edges.
Nutrition Facts
(Estimates per serving, assuming the recipe yields 16 brownies. Actual values may vary based on specific ingredients used, especially the brownie mix brand and caramel type.)
- Servings: 16 generous brownies
- Calories per serving: Approximately 350-450 kcal. Provides a significant energy boost, typical for a decadent dessert.
- Total Fat: Approximately 18-25g. Includes fats from the oil, eggs, pecans, chocolate chips, and caramel.
- Saturated Fat: Approximately 5-8g. Primarily from butter/oil in the mix, chocolate, and cream used with caramels.
- Carbohydrates: Approximately 45-55g. Mainly from the sugars in the brownie mix, caramel, and chocolate chips, plus flour.
- Sugar: Approximately 30-40g. Contributes significantly to the sweetness and overall indulgence factor.
Disclaimer: These nutritional values are estimates only. For precise information, calculate based on the specific brands and quantities of ingredients used.
Preparation Time
These Turtle Brownies live up to their “easy” name when it comes to timing:
- Prep Time: Approximately 20-25 minutes. This includes gathering ingredients, preheating the oven, preparing the pan, mixing the batter, unwrapping and melting the caramels, and layering everything. If you’re efficient and don’t need to toast the pecans, you might do it in 15-20 minutes. Unwrapping caramels can add a few minutes!
- Cook Time: Approximately 30-40 minutes. Baking time varies based on oven calibration and desired fudginess.
- Total Active Time: Around 50-65 minutes from start to finish of baking.
- Cooling Time: Crucially, allow at least 2-3 hours (or longer) for complete cooling before slicing. This passive time is essential for the best texture and easiest cutting.
Overall, while the cooling takes patience, the hands-on preparation and baking are relatively quick and straightforward, making it perfect for busy schedules when you need a show-stopping dessert.
How to Serve
These Easy Turtle Brownies are fantastic on their own, but here are some ways to elevate the serving experience:
- Simply Delicious:
- Serve them at room temperature for the perfect balance of chewy brownie and soft caramel. This is arguably the best way to appreciate the distinct layers and textures.
- Cut into generous squares and arrange them attractively on a platter.
- Warm and Gooey:
- Gently warm individual brownies in the microwave for 10-15 seconds. This makes the caramel extra gooey and the chocolate chips melty. Be careful not to overheat!
- Perfect Pairing: Serve warm brownies à la mode with a scoop of high-quality vanilla bean ice cream. The contrast between the warm, rich brownie and the cold, creamy ice cream is pure heaven.
- Alternative Ice Creams: Try caramel swirl, butter pecan, or even coffee ice cream for complementary flavor profiles.
- Extra Indulgence:
- Drizzle extra caramel sauce over the top just before serving. A sprinkle of flaky sea salt on top of the caramel drizzle enhances all the flavors beautifully.
- Add a dollop of fresh whipped cream or stabilized whipped cream for a lighter contrast to the richness.
- Dust lightly with unsweetened cocoa powder or powdered sugar for a simple, elegant finish.
- Sprinkle a few extra toasted pecan pieces or mini chocolate chips on top for visual appeal and texture.
- Beverage Pairings:
- Enjoy with a tall glass of cold milk – a classic combination for any brownie.
- Pair with a hot cup of coffee or espresso; the bitterness cuts through the richness perfectly.
- A cup of black tea or chai tea also complements the flavors well.
- For an adult treat, consider a glass of milk stout or a coffee liqueur.
- On a Dessert Platter:
- Cut the brownies into smaller, bite-sized squares (1-inch) to include them as part of a larger dessert platter alongside cookies, fruit, and other treats. This makes them perfect for parties and gatherings.
Additional Tips
Unlock the full potential of your Easy Turtle Brownies with these helpful tips:
- Toast Those Pecans: Don’t skip toasting the pecans! It takes just a few extra minutes but makes a world of difference. Toasting releases their natural oils, making them crunchier and intensifying their nutty flavor, which stands up beautifully against the rich chocolate and sweet caramel.
- Quality Ingredients Matter: While this recipe is designed for ease using a box mix, choosing a high-quality fudge brownie mix will yield a better final product. Similarly, using good quality soft caramels (like Werther’s Soft Caramels or Kraft) and pure vanilla extract (if adding to a from-scratch recipe) elevates the taste. Consider using semi-sweet or dark chocolate chips for a deeper flavor contrast.
- Parchment Paper is Your Friend: Lining the pan with parchment paper, leaving an overhang, is highly recommended. It guarantees the brownies won’t stick, makes cleanup a breeze, and allows you to lift the entire cooled slab out for easy, neat cutting on a flat surface.
- Caramel Melting Technique: Melt the caramels slowly with the cream, stirring frequently, whether using the microwave or stovetop. Overheating can make the caramel scorch or become too hard once cooled. Aim for a smooth, pourable consistency. If your caramel seems too thick, add another teaspoon or two of cream.
- Don’t Overbake: Keep a close eye on the brownies towards the end of the baking time. Overbaking will result in dry, crumbly brownies and potentially hard caramel. Remember that they will continue to cook slightly as they cool in the pan. The toothpick test (in the brownie part) should show moist crumbs, not clean or wet batter.
- Cooling is Non-Negotiable: Patience during the cooling stage is key! Attempting to cut the brownies while still warm will lead to a messy collapse, as the caramel layer needs time to firm up. Complete cooling ensures clean cuts and allows the flavors to fully develop and meld. Chilling slightly before cutting can help achieve extra-sharp edges.
- Clean Cutting: For bakery-perfect squares, use a large, sharp chef’s knife. Run the knife under hot water and wipe it dry before the first cut, and then wipe the blade clean with a damp paper towel between each subsequent cut. This prevents dragging and keeps the layers distinct. A plastic knife can also work surprisingly well for cutting sticky baked goods.
- Storage Savvy: Store leftover brownies in an airtight container at room temperature for up to 3-4 days. Layering them between sheets of wax paper can prevent sticking. While refrigeration is possible (and extends shelf life slightly), it can make the brownies harder and dry them out faster. If refrigerated, bring them to room temperature or warm slightly before serving. Freezing instructions are in the FAQ below.
Frequently Asked Questions (FAQ)
Here are answers to some common questions about making Easy Turtle Brownies:
- Q: Can I use a homemade brownie recipe instead of a box mix?
- A: Absolutely! If you have a favorite from-scratch fudge brownie recipe (designed for a 9×13 inch pan), feel free to use it as the base. Prepare the batter as directed in your recipe, then follow steps 4 through 10 from the instructions above, dividing the batter and layering with the caramel and pecans. Ensure your homemade recipe yields a sturdy enough brownie to support the caramel layer.
- Q: What’s the best type of caramel to use?
- A: Individually wrapped soft caramel candies (like Kraft or Werther’s Soft Caramels) melted down with cream provide the classic gooey texture. You can also use about 1 to 1 ½ cups of thick, store-bought caramel sauce (like the kind used for ice cream topping, but ensure it’s thick) or dulce de leche. Avoid using hard caramel candies or thin caramel syrup, as they won’t provide the right consistency. Jarred caramel dip can also work well.
- Q: Can I make these Turtle Brownies ahead of time?
- A: Yes, these brownies are great for making ahead. They store well at room temperature in an airtight container for 3-4 days. In fact, some people find the flavor even better on the second day after the ingredients have had more time to meld. Just ensure they are completely cool before storing.
- Q: How should I store leftover Turtle Brownies?
- A: Store cooled brownies in a single layer in an airtight container at room temperature. If you need to stack them, place a sheet of wax paper or parchment paper between the layers to prevent sticking. They should stay fresh for about 3-4 days. Avoid refrigerating unless necessary, as it can alter the texture, making them harder.
- Q: Can I freeze Turtle Brownies?
- A: Yes, Turtle Brownies freeze quite well! Once completely cooled and cut, wrap individual squares tightly in plastic wrap, then place them in a freezer-safe airtight container or zip-top bag. They can be frozen for up to 2-3 months. To thaw, leave them wrapped at room temperature for a few hours or overnight in the refrigerator. You can warm them slightly after thawing if desired.
- Q: Can I omit the pecans or use a different nut?
- A: Yes. If you have a nut allergy or simply don’t care for pecans, you can omit them entirely for a delicious Caramel Brownie. Alternatively, you can substitute other nuts like walnuts, almonds, or even peanuts for a different flavor profile. Ensure they are chopped and consider toasting them for enhanced flavor.
- Q: Why are they called “Turtle” Brownies?
- A: They are named after the popular “Turtle” candies, which traditionally feature pecans and caramel covered in chocolate. These brownies mimic that classic flavor combination with layers of brownie (chocolate), caramel, and pecans, delivering a similar taste experience in brownie form.
- Q: My caramel layer sunk to the bottom or mixed too much with the batter. What did I do wrong?
- A: This can happen if the bottom layer of brownie batter is too thin, the caramel is too hot or thin when poured, or if the top layer of batter is spread too vigorously. Ensure the bottom batter layer is relatively even. Let the melted caramel cool slightly before pouring it over the batter. When adding the top batter layer, dollop it gently and spread carefully, trying not to push down into the caramel layer. Some mixing is okay, but aim to keep the layers mostly distinct. Using a slightly thicker caramel sauce can also help prevent excessive sinking.

Easy Turtle Brownies
Ingredients
Here’s what you’ll need to create these decadent treats:
- 1 box (approx. 18-19 oz) Fudge Brownie Mix: The foundation of our easy recipe. Choose your favorite brand – one that promises a rich, fudgy texture works best. Plus, you’ll need the ingredients listed on the box (typically water, vegetable oil, and eggs).
- 1 cup (about 4-5 oz) Pecan Halves: Roughly chopped. These provide the essential nutty crunch characteristic of turtle candies. Toasting them beforehand enhances their flavor (see tips!).
- 1 package (11-14 oz) Soft Caramel Candies: The individually wrapped squares work perfectly. You’ll be unwrapping and melting these down for the gooey center. Alternatively, about 1 ½ cups of thick caramel sauce or dulce de leche can be used.
- 1/4 cup Heavy Cream (or Evaporated Milk): This is crucial for melting the caramel candies smoothly into a luscious, pourable sauce. It prevents the caramel from becoming too hard after baking.
- 1/2 cup Semi-Sweet Chocolate Chips: An optional but highly recommended addition! Sprinkling these over the caramel or mixing them into the top layer of brownie batter adds extra pockets of chocolatey goodness.
- Ingredients called for on the Brownie Mix Box: Typically includes Water, Vegetable Oil, and Eggs. Ensure you have these on hand as per your chosen brownie mix instructions.
Instructions
Follow these simple steps for perfectly layered Turtle Brownies:
- Preheat and Prepare: Preheat your oven to 350°F (175°C) or the temperature specified on your brownie mix box. Grease and flour a 9×13 inch baking pan. For easier removal and cleanup, line the pan with parchment paper, leaving an overhang on two sides to use as handles later. Lightly grease the parchment paper as well.
- Toast the Pecans (Optional but Recommended): Spread the chopped pecans on a dry baking sheet. Toast in the preheated oven for 5-7 minutes, or until fragrant and slightly darkened. Watch carefully to prevent burning. Set aside to cool. Toasting deepens their nutty flavor significantly.
- Prepare the Brownie Batter: In a large bowl, prepare the brownie batter according to the package directions, using the specified amounts of water, oil, and eggs. Mix until just combined – be careful not to overmix, as this can lead to tough brownies. Overmixing develops the gluten too much. Aim for a thick, uniform batter with no dry streaks remaining.
- Layer Half the Batter: Spread half of the prepared brownie batter evenly into the bottom of your prepared baking pan. Use an offset spatula or the back of a spoon to ensure it covers the entire base in a relatively even layer. This forms the bottom chocolate foundation.
- Prepare the Caramel Layer: Unwrap the soft caramel candies (this is often the most time-consuming part!). Place the unwrapped caramels and the heavy cream (or evaporated milk) in a medium microwave-safe bowl. Microwave on high in 30-second intervals, stirring well after each interval, until the caramels are completely melted and the mixture is smooth. This usually takes 1.5 to 2.5 minutes total. Alternatively, melt the caramels and cream in a small saucepan over low heat, stirring constantly until smooth. Do not overheat, or the caramel can become tough.
- Add the Caramel and Pecans: Carefully pour the melted caramel mixture evenly over the brownie batter layer in the pan. Gently spread it with a spatula if needed, but be careful not to disturb the batter underneath too much. Immediately sprinkle the toasted, chopped pecans evenly over the caramel layer. If using, sprinkle the ½ cup of semi-sweet chocolate chips over the pecans as well.
- Add the Remaining Batter: Dollop the remaining half of the brownie batter over the caramel-pecan layer. Use a spoon to place spoonfuls evenly across the surface. It’s okay if the caramel layer isn’t completely covered; some peeking through looks appealing. Gently spread the dollops with an offset spatula or knife to cover most of the caramel/pecan layer, swirling slightly if desired, but avoid mixing the layers together extensively. You want distinct layers.
- Bake: Place the pan in the preheated oven. Bake for 30-40 minutes, or until a wooden toothpick inserted into the brownie portion (avoiding the caramel pockets) near the center comes out with moist crumbs attached, but not wet batter. The exact time will depend on your oven and the specific brownie mix used. The edges should look set and slightly pulled away from the sides of the pan. Be careful not to overbake, as this will dry out the brownies and harden the caramel.
- Cool Completely: This step is crucial! Remove the pan from the oven and place it on a wire rack. Let the brownies cool completely in the pan, which can take at least 2-3 hours, or even longer. Cooling allows the caramel to set properly, preventing a gooey mess when slicing, and lets the flavors meld beautifully. Rushing this step will result in messy, less-defined squares. For best results, you can even chill them slightly in the refrigerator for 30 minutes before cutting, especially if your kitchen is warm.
- Slice and Serve: Once completely cooled, use the parchment paper overhangs to lift the entire brownie slab out of the pan onto a cutting board. Use a large, sharp knife to cut into squares. Wiping the knife clean with a damp paper towel between cuts will help ensure neat, clean edges.
Nutrition
- Serving Size: one normal portion
- Calories: 450
- Sugar: 40g
- Fat: 25g
- Saturated Fat: 8g
- Carbohydrates: 55g