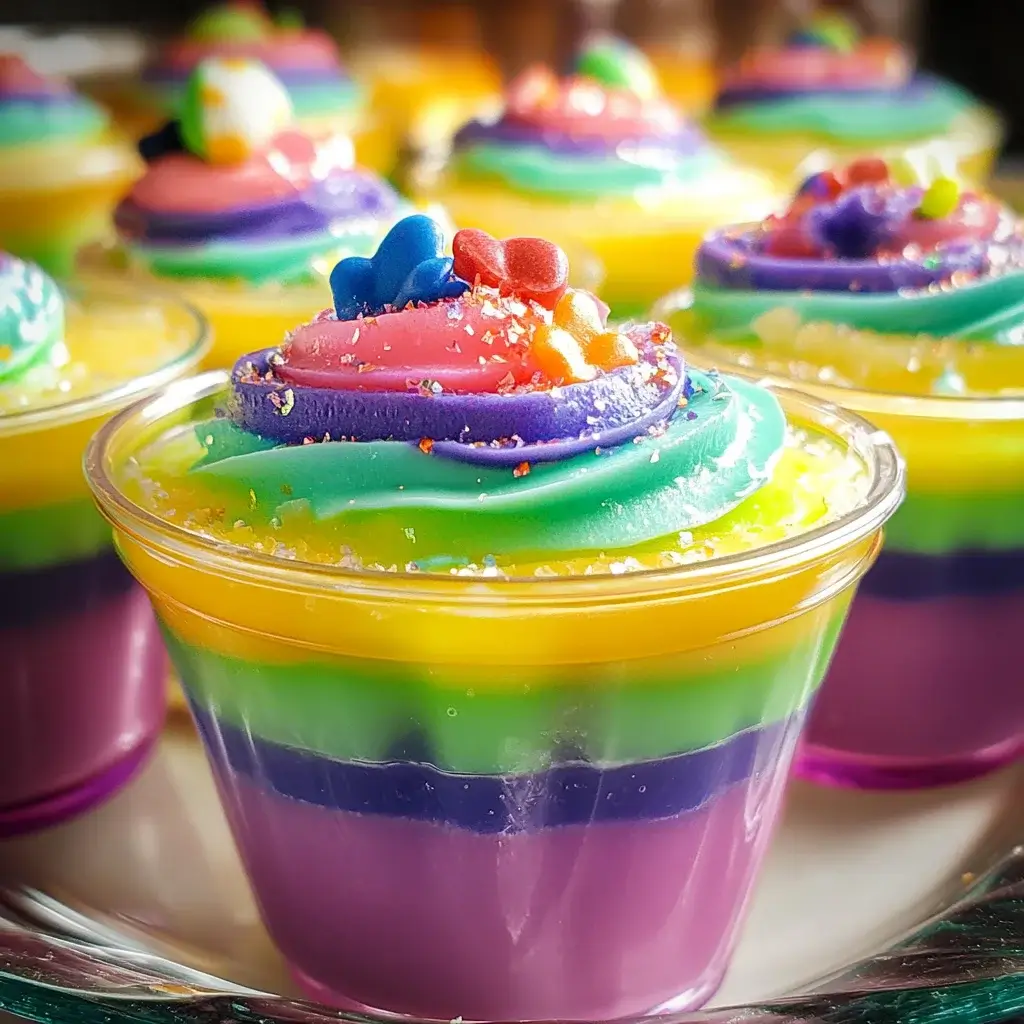

Easter at our house is always a whirlwind of pastel colors, egg hunts, and of course, delicious food. While we have our traditional dishes, I always love to add something a little extra fun and visually appealing to the dessert table. This year, it was Easter Rainbow Jello Cups that stole the show. Honestly, I was a bit skeptical at first – jello cups seemed a little…retro? But let me tell you, these are anything but outdated! The vibrant layers of rainbow colors are absolutely mesmerizing, and the jiggly texture is just pure fun, especially for the kids. My family devoured them! Even my teenager, who usually only tolerates my “cutesy” holiday creations, admitted these were “pretty cool.” They are surprisingly easy to make, and the make-ahead nature of the recipe is a lifesaver during busy holiday prep. If you’re looking for a dessert that’s both festive and foolproof, these Easter Rainbow Jello Cups are guaranteed to be a hit. Get ready to add a splash of color and a whole lot of smiles to your Easter celebration!
Ingredients for Easter Rainbow Jello Cups
- Jello in Assorted Colors (6 boxes, 3 oz each): You’ll need six different colors to create a vibrant rainbow. Popular choices include:
- Red: Strawberry, Raspberry, or Cherry
- Orange: Orange
- Yellow: Lemon or Pineapple
- Green: Lime or Green Apple
- Blue: Blue Raspberry or Berry Blue
- Purple: Grape or Black Cherry
- Boiling Water (6 cups): Essential for dissolving the gelatin and creating a smooth jello. Ensure water is at a rolling boil for best results.
- Cold Water (3 cups): Used to cool down the jello mixture and help it set properly. Ice water is ideal for speeding up the setting process.
- Whipped Topping (Optional, for garnish): Adds a creamy, decadent touch and a beautiful contrast to the jello colors. Use store-bought or homemade whipped cream.
- Easter Sprinkles (Optional, for garnish): Enhance the festive look and add a fun crunch. Choose pastel colors or Easter-themed shapes.
- Fresh Fruit (Optional, for layering or garnish): Berries like strawberries, blueberries, or raspberries can be added between layers or used as a fresh topping. Adds flavor, texture, and nutritional value.
- Clear Plastic Cups or Dessert Glasses: For individual servings and showcasing the rainbow layers. Choose clear cups to fully appreciate the vibrant colors.
Instructions for Making Easter Rainbow Jello Cups
- Prepare Your Workspace and Cups: Arrange your clear plastic cups or dessert glasses on a stable surface. Have all your Jello boxes, boiling water, and cold water readily available. Working efficiently will help ensure smooth layering.
- First Layer – Red Jello: Open one box of red Jello (strawberry, raspberry, or cherry). In a medium-sized bowl, pour the Jello powder. Add 1 cup of boiling water to the bowl and stir continuously with a whisk or spoon until the Jello powder is completely dissolved. This usually takes about 2-3 minutes. Ensure no granules remain.
- Add Cold Water and Chill: Pour ½ cup of cold water into the dissolved Jello mixture and stir gently to combine. Carefully pour the red Jello mixture evenly into the bottom of each of your prepared cups. You want to create a thin, even layer, about ¼ to ½ inch deep.
- Chill Until Set (First Layer): Place the filled cups in the refrigerator and chill for at least 1-2 hours, or until the red Jello layer is completely firm. It should be set enough to support the next layer without mixing. To test for firmness, gently touch the surface of the jello – it should be solid and not liquidy.
- Prepare Second Layer – Orange Jello: While the red layer is chilling, prepare the orange Jello layer. Repeat steps 2 and 3 using the orange Jello powder, 1 cup of boiling water, and ½ cup of cold water in a clean bowl.
- Add Second Layer (Orange) and Chill: Once the red layer is fully set, carefully and slowly pour the orange Jello mixture over the top of the red layer in each cup. Pour gently to avoid disturbing the set red layer. Return the cups to the refrigerator and chill for another 1-2 hours, or until the orange layer is firm.
- Prepare Remaining Layers (Yellow, Green, Blue, Purple): Continue this layering process, one color at a time, following the rainbow order: yellow, green, blue, and finally purple. For each color layer:
- Prepare the Jello mixture as described in steps 2 and 3, using the corresponding color Jello powder, boiling water, and cold water.
- Ensure the previous layer is fully set before carefully pouring the next layer on top.
- Chill each layer for 1-2 hours until firm before adding the next.
- Final Chill: After adding the final purple layer, chill the Easter Rainbow Jello Cups for at least 2-3 hours, or preferably overnight, to ensure all layers are completely set and firm. This longer chilling time will make them easier to serve and hold their shape.
- Garnish and Serve (Optional): Just before serving, garnish your Easter Rainbow Jello Cups as desired. You can add a dollop of whipped topping to the top of each cup. Sprinkle with Easter sprinkles for extra festivity. Fresh berries, such as sliced strawberries or blueberries, can also be added for a fresh and colorful touch.
- Enjoy!: Serve your vibrant and jiggly Easter Rainbow Jello Cups and watch the smiles spread across faces of all ages!
Nutrition Facts (Per Serving, Estimates)
(Note: Nutrition information is approximate and can vary based on specific Jello flavors, brands, and optional toppings. These estimates are based on using regular Jello and do not include whipped topping or sprinkles.)
- Serving Size: 1 cup
- Calories: Approximately 80-100 kcal
- Sugar: Approximately 18-22g
For a lower sugar and calorie option, use sugar-free Jello.
Preparation Time for Easter Rainbow Jello Cups
- Active Prep Time: Approximately 30-45 minutes (This includes dissolving the Jello for each layer and pouring into cups. The time will depend on your efficiency in preparing each layer).
- Inactive Chill Time: Minimum 8-12 hours (This is the cumulative chilling time for each layer to set properly. Plan accordingly, as this recipe requires significant chilling time between layers and for the final set).
- Total Time: Approximately 8 hours 30 minutes to 12 hours 45 minutes (Primarily inactive chilling time. This recipe is best started well in advance of when you plan to serve it, ideally the day before).
- Make-Ahead Friendly: This recipe is exceptionally make-ahead friendly. You can prepare the Jello Cups up to 2-3 days in advance and store them covered in the refrigerator. This makes it perfect for Easter gatherings or busy schedules.
How to Serve Easter Rainbow Jello Cups
- Chilled and Ready: Serve the Easter Rainbow Jello Cups directly from the refrigerator. They are best enjoyed cold and jiggly.
- Individual Servings: Present them in the clear plastic cups or dessert glasses you used for layering. This showcases the beautiful rainbow effect and makes for easy serving and cleanup.
- Garnished with Whipped Topping and Sprinkles: A classic and festive way to serve. Add a swirl of whipped topping just before serving and sprinkle with Easter-themed sprinkles or pastel-colored jimmies.
- Fresh Fruit Toppings: Enhance the flavor and add a healthy element by topping with fresh berries like strawberries, raspberries, blueberries, or sliced kiwi. Arrange the fruit attractively on top of the whipped cream or directly on the jello.
- Layer with Fruit: For added texture and flavor within the cups, consider layering small pieces of fresh fruit between the jello layers. Strawberries, raspberries, mandarin orange segments, or pineapple chunks work well. Ensure fruit is added in thin layers so it doesn’t disrupt the jello setting process.
- Elegant Presentation: For a more sophisticated presentation, use stemmed dessert glasses or small parfait glasses instead of plastic cups. Garnish with a sprig of mint or a delicate edible flower alongside the whipped cream and sprinkles.
- Kids’ Party Fun: Serve them at children’s Easter parties or gatherings. Kids will be captivated by the rainbow colors and the fun, jiggly texture. Consider adding gummy candies or small Easter candies as garnishes for an extra treat (in moderation!).
- Easter Brunch or Dessert Table: Incorporate them into your Easter brunch or dessert table spread. Their vibrant colors will add a pop of visual appeal to your table setting. Arrange them alongside other Easter desserts like carrot cake, cupcakes, or cookies.
Additional Tips for Perfect Easter Rainbow Jello Cups
- Patience is Key: The most important tip for rainbow jello cups is patience! Allow each layer to set completely before adding the next. Rushing the process can lead to colors bleeding together and a less defined rainbow effect.
- Use Clear Cups: Opt for clear plastic cups or glass dessert dishes. This is crucial for showcasing the vibrant rainbow layers and making the dessert visually appealing. Opaque cups will hide the best part!
- Gentle Pouring: When pouring each new Jello layer, pour slowly and gently over the back of a spoon or spatula held just above the set layer. This helps to disperse the liquid gently and prevents it from disturbing the set layer beneath.
- Speed Up Setting (Ice Water): To slightly speed up the setting time between layers, use ice water instead of regular cold water when preparing the Jello mixtures. The colder temperature will help the gelatin set faster.
- Sugar-Free Option: To make a healthier version, use sugar-free Jello in all the rainbow colors. This significantly reduces the sugar and calorie content while still maintaining the vibrant colors and jiggly texture.
- Flavor Variations: Get creative with flavor combinations! While sticking to classic rainbow colors, you can experiment with different Jello flavors within each color category. For example, use black cherry for purple, blue raspberry for blue, and lime for green.
- Add a Creamy Layer (Optional): For an extra layer of texture and richness, consider adding a creamy layer between the jello layers. A simple creamy layer can be made by mixing sweetened condensed milk with a little unflavored gelatin and chilling until set. A thin layer of vanilla pudding or even a layer of stabilized whipped cream can also work.
- Make it a Family Activity: Making Easter Rainbow Jello Cups can be a fun activity to do with kids! Let them help with stirring the Jello mixtures (with adult supervision for hot water), pouring layers (older children), and adding sprinkles and garnishes. It’s a great way to get them involved in Easter preparations.
Frequently Asked Questions (FAQ) About Easter Rainbow Jello Cups
Q1: How long does it take for each layer of Jello to set?
A: Each layer of Jello typically takes about 1-2 hours to set firmly in the refrigerator. This can vary slightly depending on the temperature of your refrigerator and the thickness of the layer. It’s always best to check for firmness before adding the next layer by gently touching the surface.
Q2: Can I make these Jello Cups ahead of time?
A: Yes, absolutely! Easter Rainbow Jello Cups are perfect for making ahead. You can prepare them up to 2-3 days in advance and store them covered in the refrigerator. This makes them ideal for Easter gatherings or when you need to prep ahead for a party.
Q3: What if my Jello layers are bleeding together?
A: Layer bleeding usually happens when the previous layer isn’t fully set before adding the next one, or if the new layer is poured too forcefully. Ensure each layer is firm before adding the next, and pour gently over the back of a spoon to minimize disturbance.
Q4: Can I use unflavored gelatin instead of Jello?
A: While you could technically use unflavored gelatin and add your own flavoring and coloring, it’s much simpler and more convenient to use pre-flavored and colored Jello mixes for this recipe. It ensures consistent color and flavor for each layer.
Q5: Can I add fruit to the Jello Cups?
A: Yes, you can add fruit! You can layer small pieces of fruit between the jello layers, or use fresh fruit as a topping. Soft fruits like berries, mandarin oranges, and kiwi work well. Avoid using fresh pineapple or kiwi directly in the jello mixture as they contain enzymes that can prevent gelatin from setting properly. Canned pineapple is usually okay as the enzymes are deactivated during canning.
Q6: How do I store leftover Easter Rainbow Jello Cups?
A: Store leftover Jello Cups covered in the refrigerator for up to 3-4 days. They are best consumed within this timeframe for optimal texture and flavor.
Q7: Can I freeze Easter Rainbow Jello Cups?
A: Freezing Jello is generally not recommended as it can change the texture and make it watery and grainy upon thawing. It’s best to store and serve them chilled from the refrigerator.
Q8: What are some variations I can try?
A: There are many fun variations! You can try:
* Creamy Rainbow Jello: Add a creamy layer (as mentioned in tips).
* Sparkling Jello: Use sparkling water or club soda instead of cold water for a slightly bubbly texture.
* Theme it: Use different color combinations for other holidays or events.
* Adult Version: Add a splash of flavored vodka or rum to each Jello layer (use sparingly and be mindful of alcohol content).
Easter Rainbow Jello Cups are more than just a dessert; they’re a celebration in a cup! With their vibrant colors, jiggly texture, and make-ahead ease, they are the perfect addition to your Easter festivities and are sure to bring smiles and joy to everyone who tries them. Happy Easter baking!
Print
Easter Rainbow Jello Cups
Ingredients
- Jello in Assorted Colors (6 boxes, 3 oz each): You’ll need six different colors to create a vibrant rainbow. Popular choices include:
- Red: Strawberry, Raspberry, or Cherry
- Orange: Orange
- Yellow: Lemon or Pineapple
- Green: Lime or Green Apple
- Blue: Blue Raspberry or Berry Blue
- Purple: Grape or Black Cherry
Choose sugar-free options for a lighter dessert.
- Boiling Water (6 cups): Essential for dissolving the gelatin and creating a smooth jello. Ensure water is at a rolling boil for best results.
- Cold Water (3 cups): Used to cool down the jello mixture and help it set properly. Ice water is ideal for speeding up the setting process.
- Whipped Topping (Optional, for garnish): Adds a creamy, decadent touch and a beautiful contrast to the jello colors. Use store-bought or homemade whipped cream.
- Easter Sprinkles (Optional, for garnish): Enhance the festive look and add a fun crunch. Choose pastel colors or Easter-themed shapes.
- Fresh Fruit (Optional, for layering or garnish): Berries like strawberries, blueberries, or raspberries can be added between layers or used as a fresh topping. Adds flavor, texture, and nutritional value.
- Clear Plastic Cups or Dessert Glasses: For individual servings and showcasing the rainbow layers. Choose clear cups to fully appreciate the vibrant colors.
Instructions
- Prepare Your Workspace and Cups: Arrange your clear plastic cups or dessert glasses on a stable surface. Have all your Jello boxes, boiling water, and cold water readily available. Working efficiently will help ensure smooth layering.
- First Layer – Red Jello: Open one box of red Jello (strawberry, raspberry, or cherry). In a medium-sized bowl, pour the Jello powder. Add 1 cup of boiling water to the bowl and stir continuously with a whisk or spoon until the Jello powder is completely dissolved. This usually takes about 2-3 minutes. Ensure no granules remain.
- Add Cold Water and Chill: Pour ½ cup of cold water into the dissolved Jello mixture and stir gently to combine. Carefully pour the red Jello mixture evenly into the bottom of each of your prepared cups. You want to create a thin, even layer, about ¼ to ½ inch deep.
- Chill Until Set (First Layer): Place the filled cups in the refrigerator and chill for at least 1-2 hours, or until the red Jello layer is completely firm. It should be set enough to support the next layer without mixing. To test for firmness, gently touch the surface of the jello – it should be solid and not liquidy.
- Prepare Second Layer – Orange Jello: While the red layer is chilling, prepare the orange Jello layer. Repeat steps 2 and 3 using the orange Jello powder, 1 cup of boiling water, and ½ cup of cold water in a clean bowl.
- Add Second Layer (Orange) and Chill: Once the red layer is fully set, carefully and slowly pour the orange Jello mixture over the top of the red layer in each cup. Pour gently to avoid disturbing the set red layer. Return the cups to the refrigerator and chill for another 1-2 hours, or until the orange layer is firm.
- Prepare Remaining Layers (Yellow, Green, Blue, Purple): Continue this layering process, one color at a time, following the rainbow order: yellow, green, blue, and finally purple. For each color layer:
- Prepare the Jello mixture as described in steps 2 and 3, using the corresponding color Jello powder, boiling water, and cold water.
- Ensure the previous layer is fully set before carefully pouring the next layer on top.
- Chill each layer for 1-2 hours until firm before adding the next.
- Final Chill: After adding the final purple layer, chill the Easter Rainbow Jello Cups for at least 2-3 hours, or preferably overnight, to ensure all layers are completely set and firm. This longer chilling time will make them easier to serve and hold their shape.
- Garnish and Serve (Optional): Just before serving, garnish your Easter Rainbow Jello Cups as desired. You can add a dollop of whipped topping to the top of each cup. Sprinkle with Easter sprinkles for extra festivity. Fresh berries, such as sliced strawberries or blueberries, can also be added for a fresh and colorful touch.
- Enjoy!: Serve your vibrant and jiggly Easter Rainbow Jello Cups and watch the smiles spread across faces of all ages!
Nutrition
- Serving Size: one normal portion
- Calories: 100
- Sugar: 22g